This post will describe what hardware to buy & how to configure it so that you have 2 wireless networks in your house: One that seamlessly forces all of the traffic on that network through a VPN–and one that connects to the Internet normally . When finished, the internet activity for any device connected to the first network will be entirely encrypted so that the ISP cannot see which websites are visited*, what software you use, and what information you send & receive on the internet.
* Assuming your config doesn’t leak DNS; see improvements section
Update 2017-08-25: Added “kill switch” firewall rule that prevents LAN traffic from escaping to the ISP unless it passed through the VPN’s vtun0 interface first. Following this change, if the VPN connection is down, the internet will not be accessible (as desired) over the ‘home’ wifi network (without this, the router bypasses the VPN by sending the packets straight to the ISP–giving a false sense of privacy).
Update 2021-02-01: Fixed GitHub URL of cryptostorm’s free OpenVPN configuration file
Update 2021-02-14: Fixed GitHub URL of cryptostorm’s paid OpenVPN configuration file
Update: I wrote this guide in 2017. It’s intended for an audience that has knowledge of *nix, Networking (DNS, firewalls, NATs), and OpenVPN.
I highly recommend Ubiquiti equipment for enterprise, home-office, or power users who want quality hardware running their WiFi networks. If you specifically want to setup a dual-SSID (one with whole-house-VPN) using Ubiquiti equipment, then keep reading.
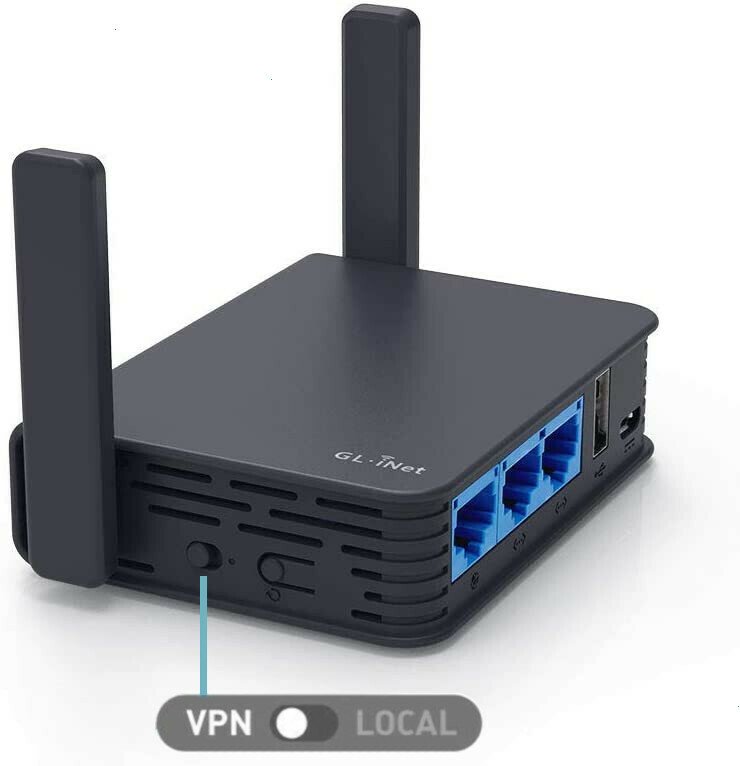
However, if you just want a simpler-to-setup whole-house VPN where the VPN can be toggled with a hardware switch, then you might want to buy a whole-house VPN wireless router from GL.iNET instead.
You can buy a GL.iNet Slate Gigabit VPN Router for about $50 new.
Buy the GL.iNet Slate Gigabit VPN Router on Amazon
Why
In April 2017, Trump signed Bill S.J.Res.34, which repeals the Broadband Consumer Privacy Proposal from October 2016. This enormous step backwards permits anyone’s ISP to sell their Internet activity. The EFF put it best:
companies like Cox, Comcast, Time Warner, AT&T, and Verizon will have free rein to hijack your searches, sell your data, and hammer you with unwanted advertisements. Worst yet, consumers will now have to pay a privacy tax by relying on VPNs to safeguard their information.
This post will describe how to setup such a VPN in a seamless manner. Your router will automatically relay all your traffic to your VPN provider. The devices themselves don’t require any special configuration. All your ISP will see is a bunch of useless encrypted data on its way to your VPN provider.
Why not VPN all-the-things (cough Netflix)
Not only will your ISP see traffic going to your VPN provider, the site you’re accessing will also see your traffic originating from your VPN provider. Because VPN providers are sometimes used by customers to bypass geolocks (and, indeed, you’ll be able to choose which country/region you’d like your traffic to “originate” from using this config), many services (ie: netflix) simply block any customers whose traffic originated from a known VPN network.
Another reason you may choose not to use a VPN is for applications that require low-latency. For example, video games.
For the above reasons, you’ll be able to connect to the wifi network “home-clear.” Traffic on this wireless network will be sent out of the router in “cleartext” to your ISP, skipping the encrypt-and-send-to-vpn step.
Hardware
This solution is achievable with lots of different hardware, but I’m just going to describe the hardware I used. If you found a way to achieve the same results with different hardware, please post your devices & configuration in the comments 🙂
Here’s a couple posts on doing Whole House VPN using CryptoStorm with ddwrt & tomato:
Router
The router we choose for this guide needs to be a general-purpose router with DHCP & DNS servers, but it also needs to support VLANs, firewalls, and be able to run an OpenVPN client. It should also be well-built with sufficient RAM & good reviews–unlike many cheap dlink/linksys consumer-grade routers.
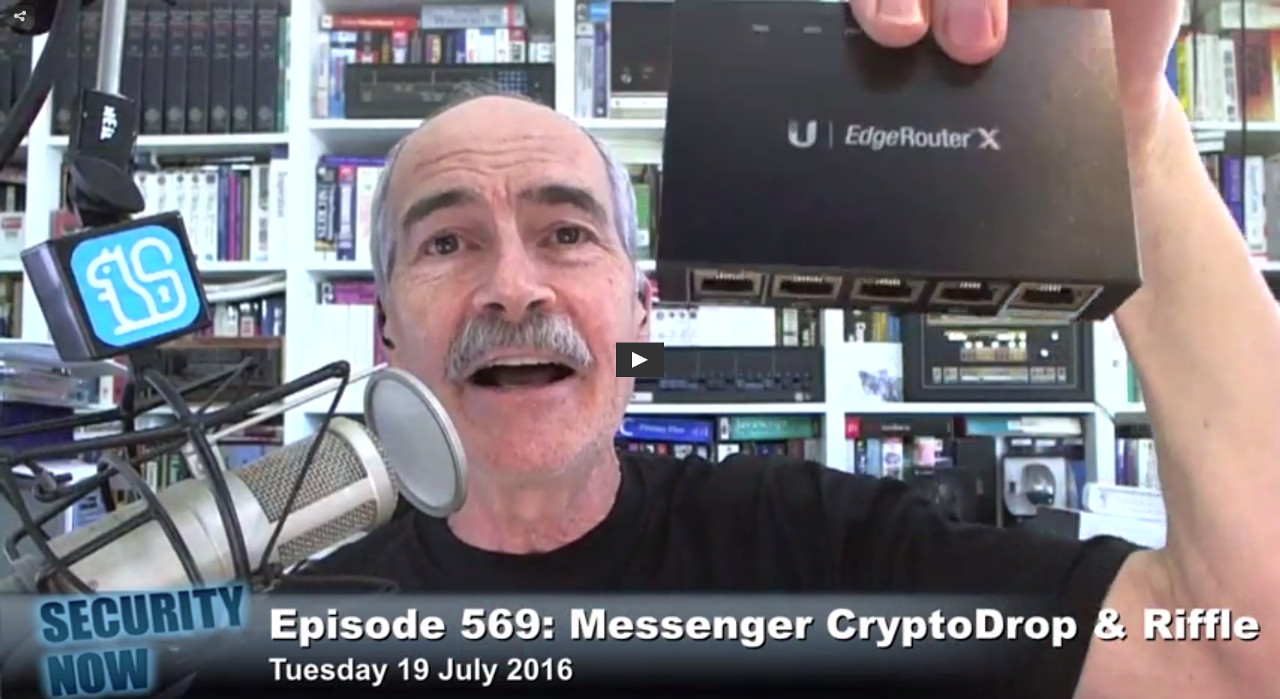
Steve Gibson (Security Researcher, host of Security Now!) has often recommended the Ubiquiti EdgeRouter X (ER-X) for its VLAN support, thereby allowing segregating IoT devices from the rest of the network. It’s a cute, small, 5-port router running EdgeOS–which is a fork of Vyatta, which was based from Debian (squeeze).
You can buy an ER-X router for $50-$150 new.
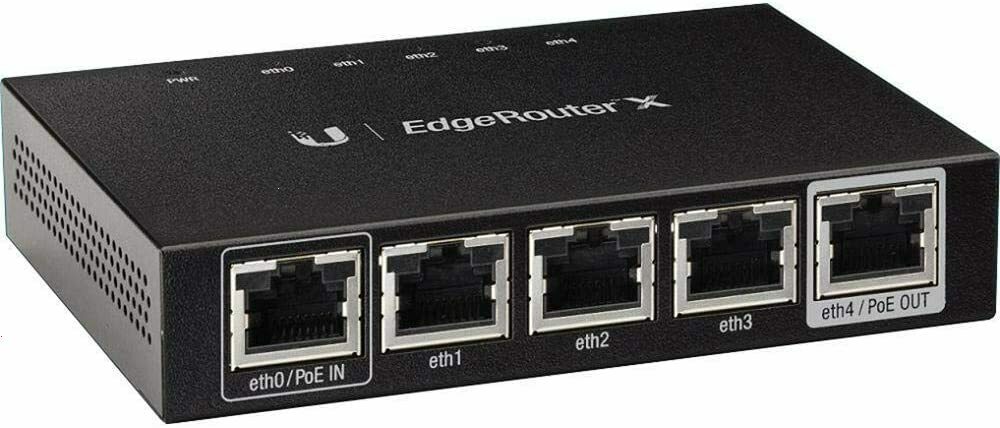
Buy the Ubiquiti EdgeRouter X on Amazon
Access Points
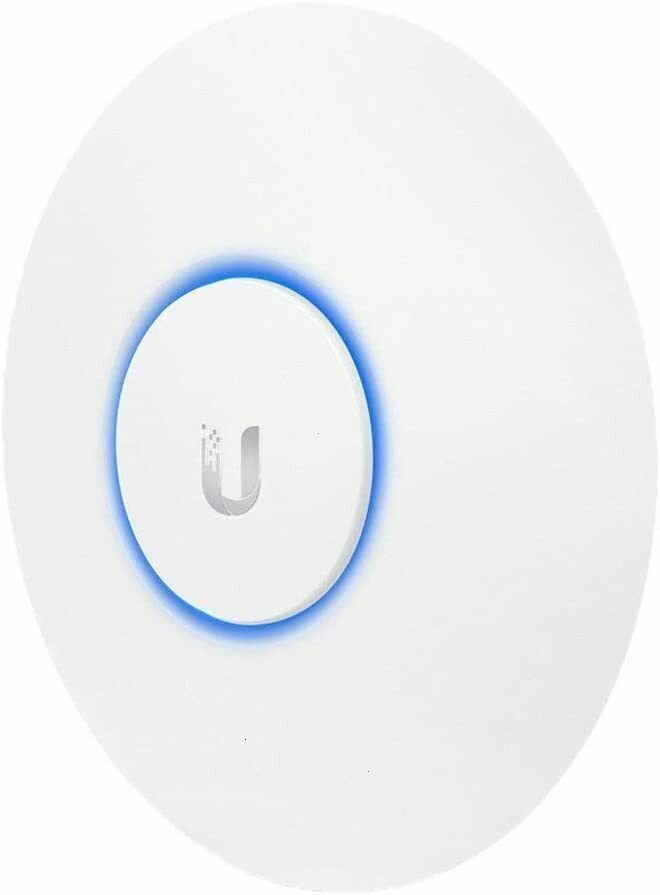
Probably the most popular small-business-grade APs available today are the Ubiquiti Access Points. I recommend the Ubiquiti UniFi AP AC Lite, as it supports both 2.4 & 5 Ghz.
You can buy this Ubiquiti AP for $80-$100 new.
If you have a very large area to cover, you might need to get a few of these (but know that Ubiquiti APs have much better coverage than your typical consumer-grade APs)
Buy the Ubiquiti AP AC Lite on Amazon
Why brick-and-mortars + Cash are good
Oh, and expect delays when shipping these devices so the FBI can intercept the device & install spyware on it.
“People go, ‘Oh, well, the CIA’s not gonna be breaking into my house, right?’ And that’s actually true.
…
What they do is they wait for when these devices are being shipped to you, when you order them on Amazon or whatever. They go to them at the airports. They get the box. They use a little hair dryer to soften the adhesive. They open up the box. Then they put the USB stick in. They seal the box back all nice and perfect, and then they ship it on to you. And now your router, your computer, your TV is hacked. This is a very routine thing that happens”-Edward Snowden on Intercepted “Snowden vs. Trump” 2017-03-15

…I recommend buying these devices at a brick-and-mortar for cash.
Architecture
Let’s describe how these devices will be configured.
Physical Ports
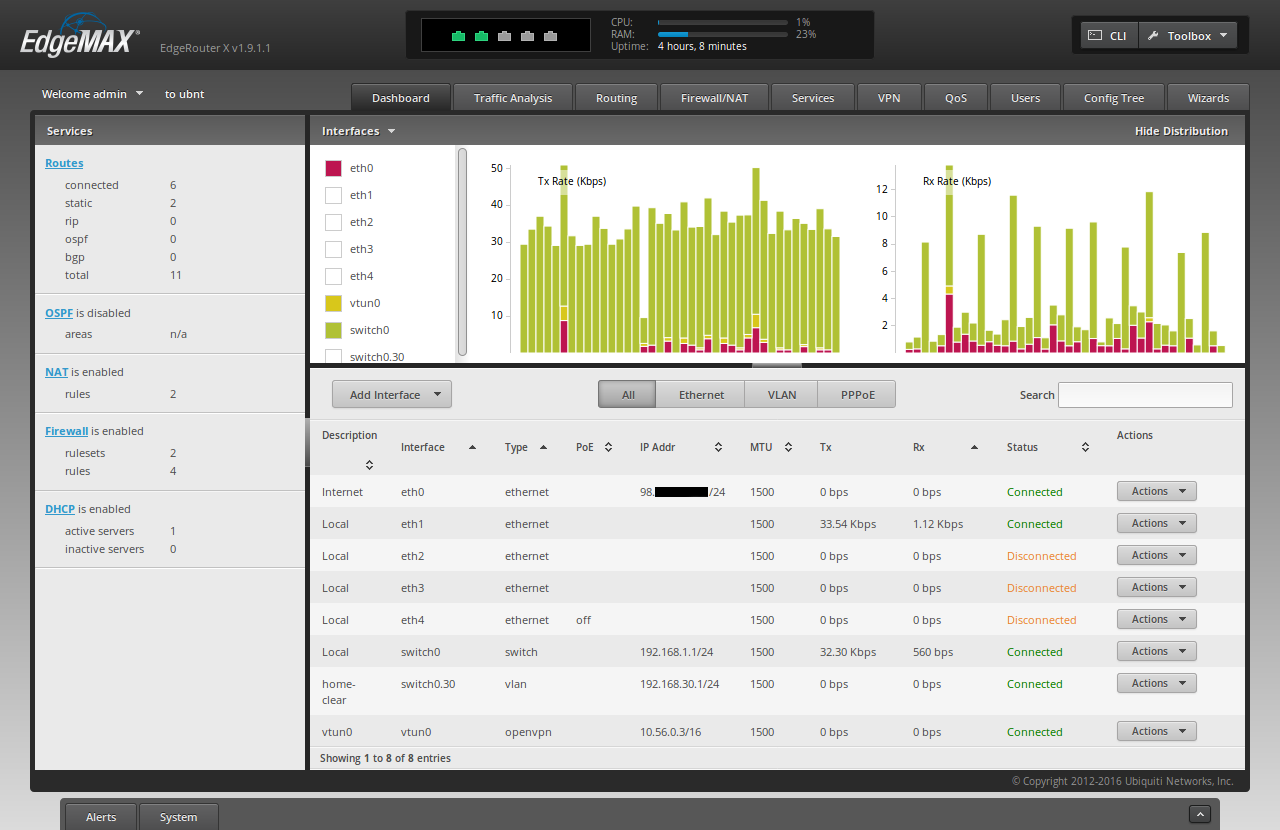
The ER-X has 5 physical ports: eth0, eth1, eth2, eth3, & eth4.
In this config, eth0 will be WAN (the ethernet cable will connect to the ISP’s modem).
All other ports (eth1, eth2, eth3, & eth4) will be LAN ports making up switch0. Cables from these ports will either go directly to computers/devices on the network, to Access Points providing wifi to the network, or to a switch that goes to computers/devices/APs.
In this article, eth1 will be used by the AP. All other ports are unused.
VLAN
In addition to switch0 made up of physical ports, we’ll create a switch0.30 on a VLAN tag=30. We will configure the Access Points to tag packets from clients connected to the ‘home-clear’ SSID with VLAN tag=30 so the ER-X router puts them in switch0.30 under a distinct subnet. Clients connected to the ‘home’ SSID will have untagged packets; they will be using switch0.
SSIDs
We will have 2 SSIDs:
- ‘home’ All traffic on this wireless network will be forced out to the VPN
- ‘home-clear’ All traffic on this wireless network will be sent out normally in “cleartext”* to the ISP
* If you’re using end-to-end encryption (ie: https), the ISP will only be able to see where you’re sending your traffic. The payload of your packets will still be encrypted when sent to your ISP.
Subnets
We will have the following subnets:
- 192.168.1.0/24 LAN for ‘home’ wireless & hard-wired clients for traffic destined to the VPN
- 192.168.30.0/24 VLAN for ‘home-clear’ wireless for traffic destined to be sent straight to the ISP, not the VPN
- 10.56.0.0/16 VPN network. This may change at cryptostorm’s discretion
And, once finished, the routetable should look something like this
admin@ubnt:~$ ip r
0.0.0.0/16 dev vtun0  proto kernel  scope link
default via 98.X.X.1 dev eth0  proto zebra
10.56.0.0/16 dev vtun0  proto kernel  scope link  src 10.56.0.3
98.X.X.0/24 dev eth0  proto kernel  scope link  src 98.X.X.X
192.168.1.0/24 dev switch0  proto kernel  scope link  src 192.168.1.1
192.168.30.0/24 dev switch0.30  proto kernel  scope link  src 192.168.30.1
DHCP
Our router will have two DHCP servers:
- 192.168.1.0/24 LAN
- 192.168.30.0/24 VLAN
Additionally, the router will be a DCHP client for getting IP addresses for two interfaces:
- eth0 ISP WAN
- vtun0 VPN
DNS
Our LAN & VLAN subnets will be configured to use OpenDNS nameservers:
- 208.67.222.222
- 208.67.220.220
This is less than ideal (DNS usually is), but generally not an issue as OpenDNS can only log DNS lookups originating from cryptostorm’s servers. See improvements section for more information.
Firewall
We will create a firewall rule for the LAN subnet to use a distinct route table that sends traffic out on vtun0.
We will also create a “eth0 out” firewall ruleset that will drop by default & only allow outbound traffic that’s either [a] established/related, [b] originating from the vpn’s vtun0 interface, or originating from the vlan = the ‘home-clear’ wifi network.
Software
In my personal searches, I feel the most transparent & trustworthy vpn service today is cryptostorm. I am in no way affiliated with cryptostorm.
For testing before buying, cryptostorm provides cryptofree–a free version of their service that’s capped at “about 160kbps down, 130 kbps up.” This guide will use cryptofree’s configs so you can play before you buy. Later in this guide I’ll describe how to update your OpenVPN config to use purchased cyrptostorm tokens that are uncapped.
Cryptostorm offers VPN service only using OpenVPN, which is supported by the ER-X.
Configuration
This section will describe how to configure each network device
Router
The first thing we’re going to setup is your router. In this section, we’ll assume you’re using the Ubiquiti EdgeRouter X (ER-X).
Connect
After unboxing your router, plug in the power adapter, and connect a patch ethernet cable between your computer and the router’s eth0 port. Set your computer to use a static IP address on the 192.168.1.x subnet, such as 192.168.1.100 (gateway=192.168.1.1 & netmask=255.255.255.0).
Connect to the router’s web UI by typing ‘https://192.168.1.1’ in your web browser. Unfortunately you’ll have to accept an exception for the router’s self-signed https certificate. TOFU yall.

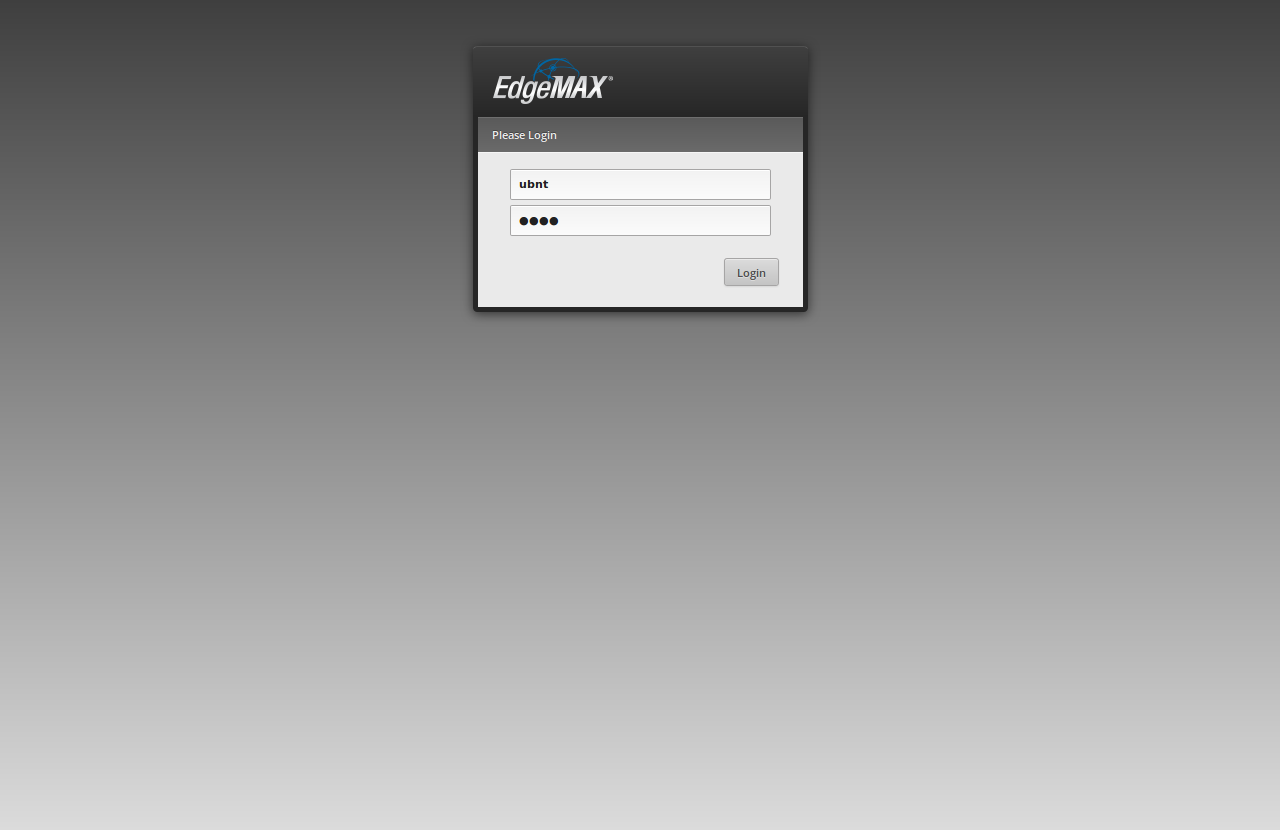
Login with the default username of ‘ubnt’ & password of ‘ubnt’.
Update Firmware
At the time of writing, the latest firmware is v1.9.1.1, but my router did not come with the latest firmware. Before you begin to configure your new router, you should make sure you update to the latest firmware.
To determine your current firmware, check to top-left of the web UI. It should say “EdgeRouter X v1.9.1.1” or similar.
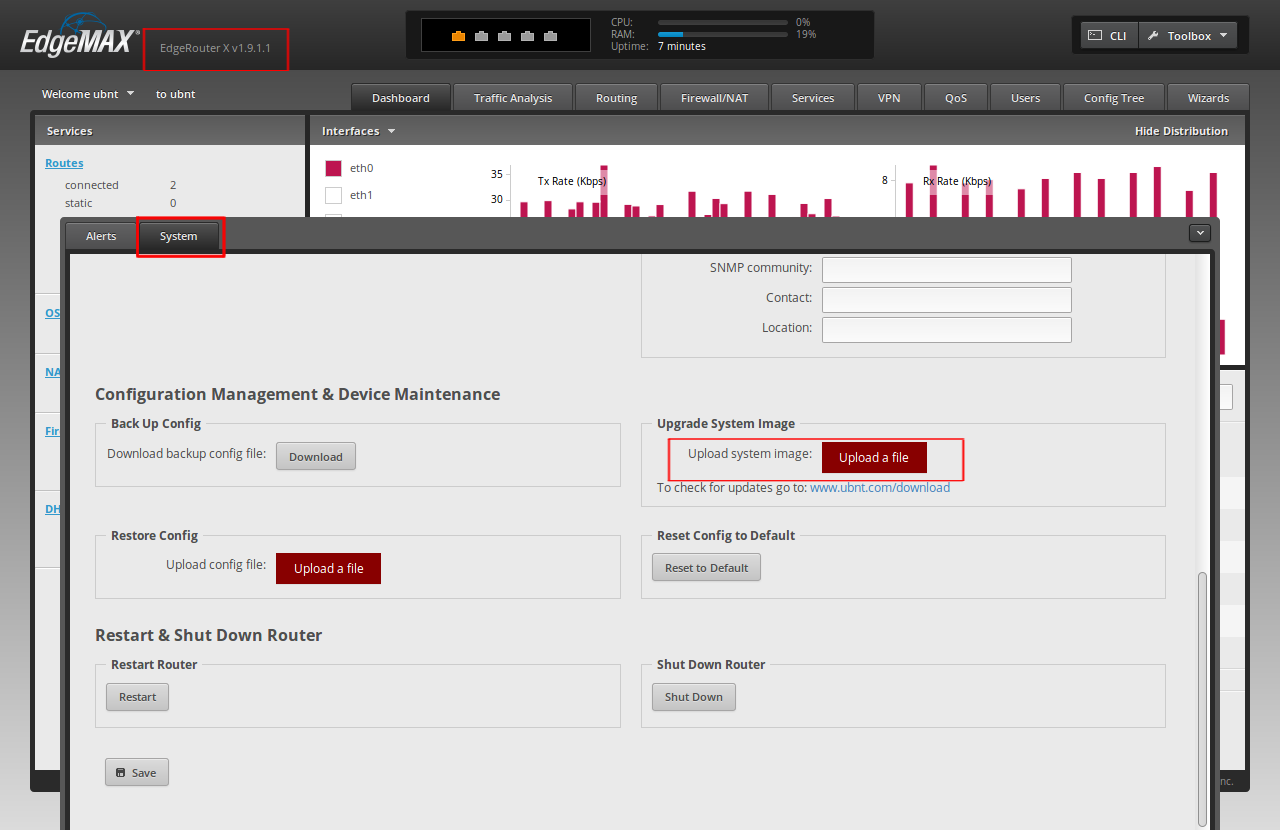
To determine the latest available firmware version, check Ubiquiti’s downloads page for the EdgeRouter X. If necessary, download the latest firmware, then navigate to System -> Upload System Image to update the router’s firmware.
I also recommend downloading the Edge OS User Guide, which is an invaluable reference when working with your router; it is a great supplement to this article if you get stuck.
Wizard
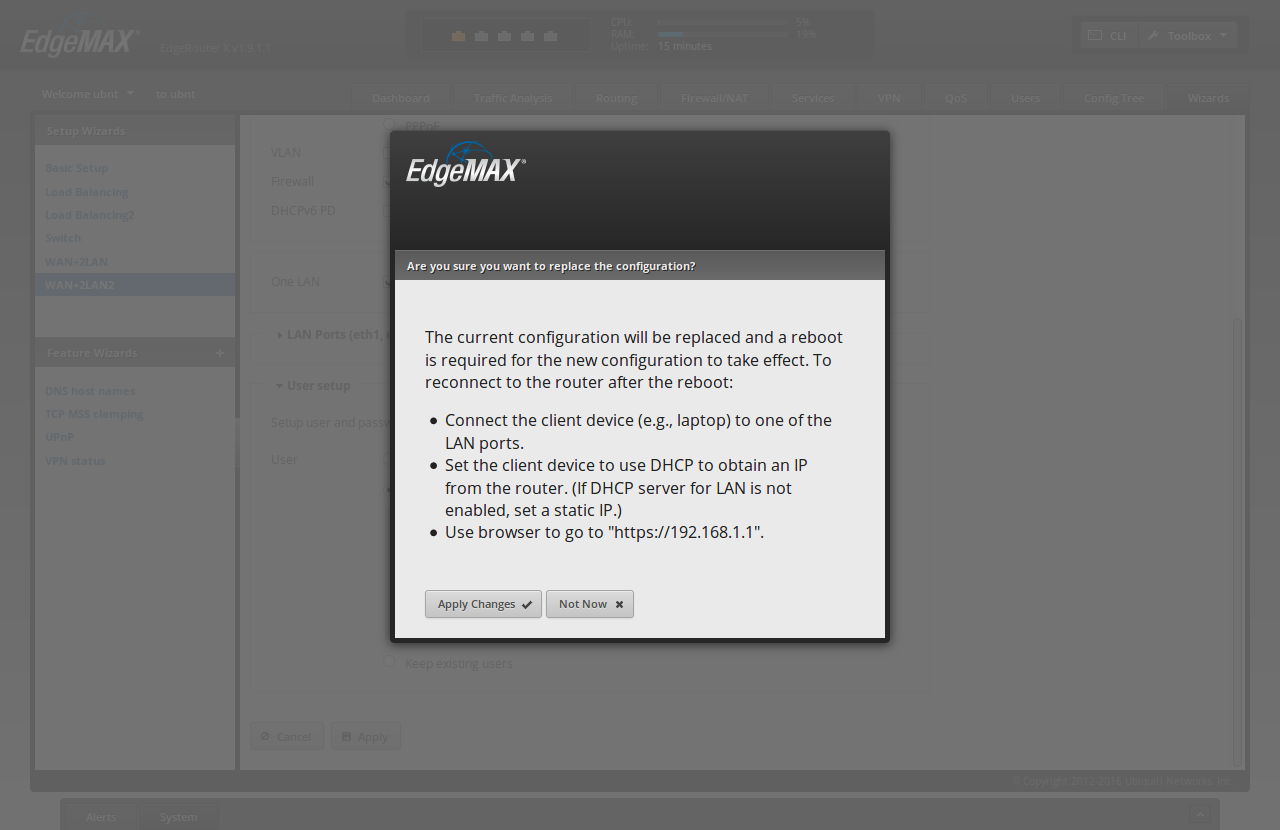
After you’ve verified that you’re running the latest firmware, we can setup the router by connecting it to the WAN (Internet) on eth0, configuring eth[1-4] as a LAN switch, and setting up DHCP & DNS. The easiest way to set this up is to go to Wizard -> WAN+2LAN2 in the web UI.
The default options should be fine–except you’ll want to click “Create new admin user” at the bottom. Type ‘admin’ for the ‘User’, and enter a new username & password under the “User setup” section. Be sure to use a good, long passphrase.

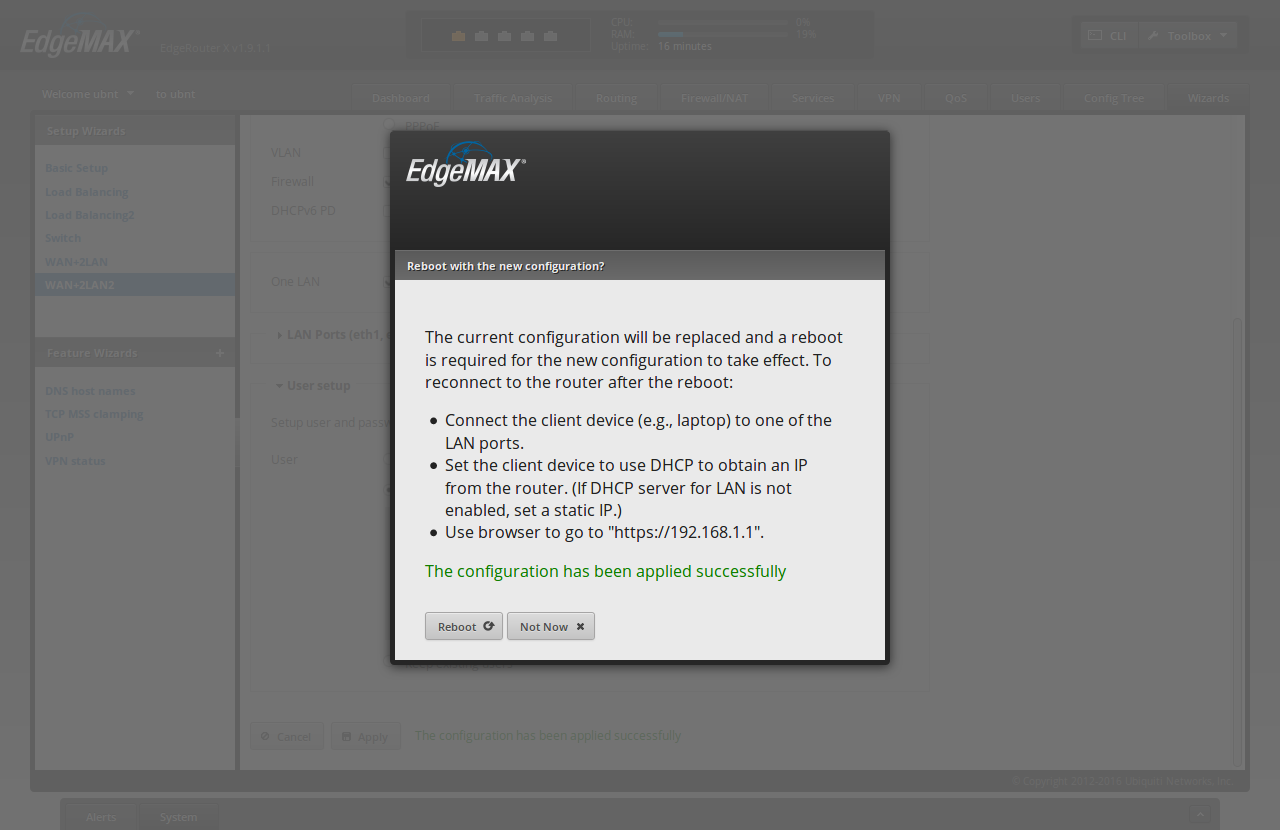
Click ‘Apply’. The WUI will warn you.
Click ‘Apply Changes’. It should say ‘The configuration has been applied successfully’
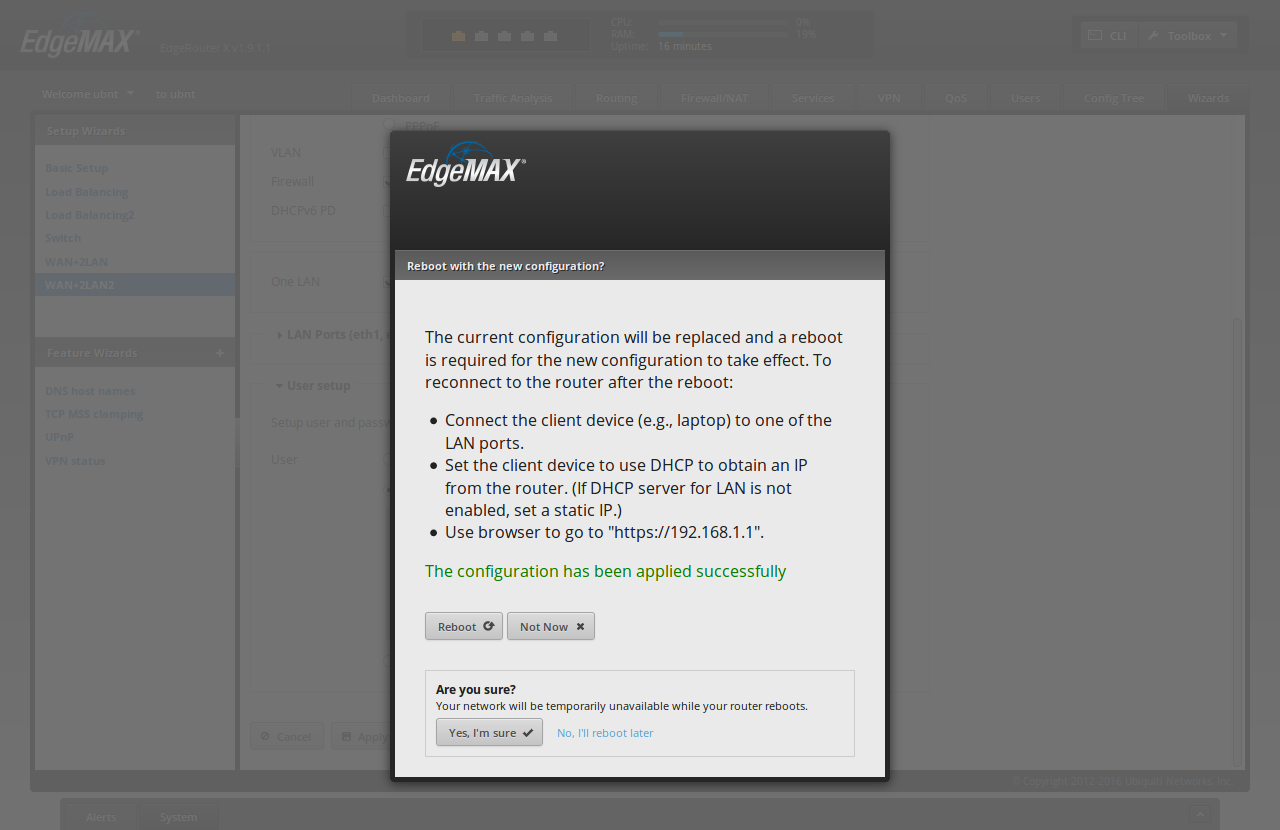
Click ‘Reboot’. It should say “Are you sure? Your network will be temporarily unavailable while your router reboot”
Click ‘Yes, I’m sure’
Verify
While your router reboots, do the following:
- Change your computer’s network configuration from static back to dhcp
- Unplug the ethernet port from the router’s eth0 port. Replug it into eth4
Your computer should get an IP address.
Now, go to ‘https://192.168.1.1’ in your browser, and login with the ‘admin’ account created through the wizard above.
If you can login successfully, then plug-in the ethernet cable coming out of your modem into your ER-X’s eth0 port.
Wait a few minutes, and verify that [a] your router has an Internet IP address for eth0 and [b] your computer has Internet access before proceeding.

Access Points
This section will describe how to setup your Ubiquiti Unifi Access Points (APs) to have 2 separate wireless network SSIDs. One of these will be on a separate vlan. We’ll later configure the router to send this vlan traffic directly to the ISP, rather than to the VPN.
For brevity, I will only describe how to configure only 1 AP, but most setups will have >1 AP, and it’s trivial to apply the knowledge for subsequent APs.
Power
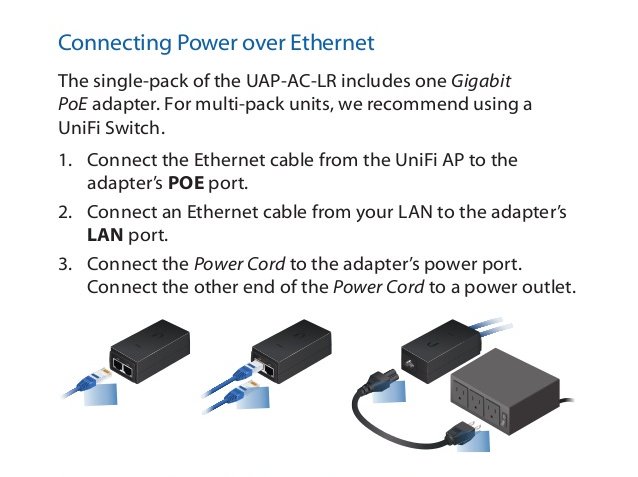
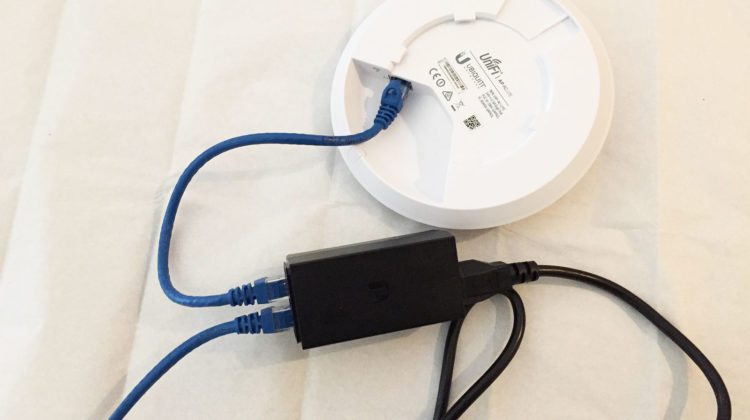
After unboxing your Ubiquiti Unifi AP, attach one end of an ethernet cable into the Access Point and the other end into the POE adapter on the side labeled “POE”. Take another ethernet cable and attach one end into the side of POE adapter labeled “LAN” and attach the other end into the router’s port eth1.
Now, plug in the power cable for the POE adapter. The Unifi AP should power-on.
Controller Software Install
Unifi APs don’t have a built-in WUI. Instead, you need to run a Unifi Controller server, which can be run on Mac, Windows, or Linux. I installed the debian package on Ubuntu, but it may be easier to blow the dust off an old laptop in the closet, install windows on it, and use that as your Ubiquiti Controller. Make sure you download the latest version of the Controller software.
After your controller is installed, you can access it in the browser on port 8443. For example, I’m running the Controller locally on my linux laptop, so I type ‘https://127.0.0.1:8443’ into my browser. Again, you’ll have to accept adding an exception to your browser for the Controller’s self-signed certificate.
Controller Software Configuration
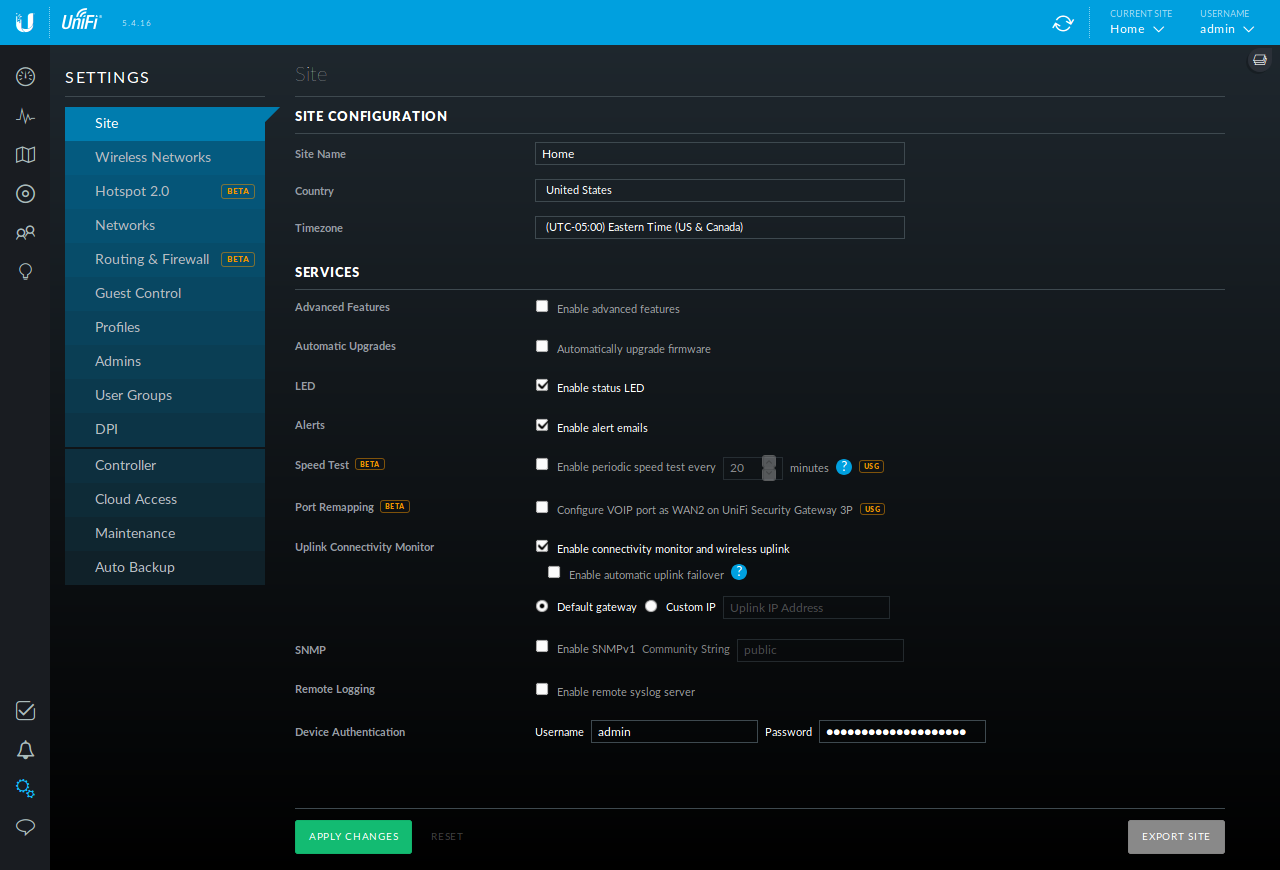
Before proceeding, with the AP’s config, go to Settings -> Site in the Controller WUI. Set a Username & Password for the “Device Authentication” section. Be sure to use a good, long passphrase.
Now, create your 2x SSIDs by going to Settings -> Wireless Networks in the Controller WUI.
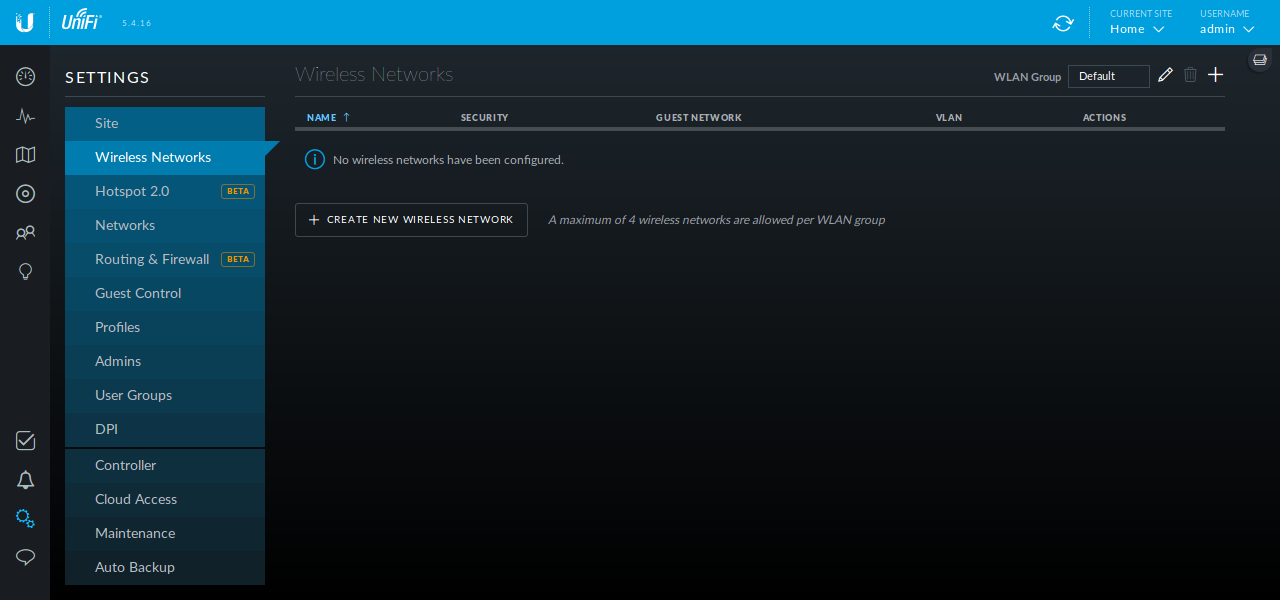
Click “CREATE NEW WIRELESS NETWORK”
For “Name/SSID”, type ‘home’, and check ‘WPA Personal’. Type a good, long passhprase for your wireless network. This is the passphrase you’ll enter on all your devices when you connect to the wifi. Note that Ubiquiti supports “guest networks,” but this is outside the scope of this article.
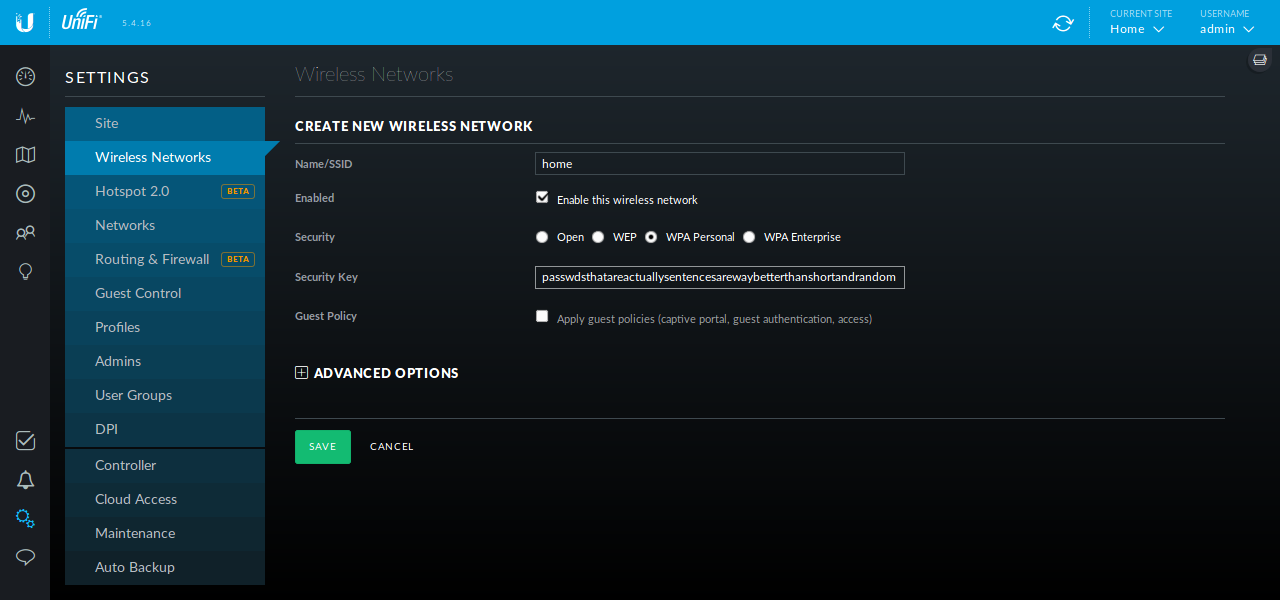
Click ‘Save’
Now create the second SSID:
Click “CREATE NEW WIRELESS NETWORK”
For “Name/SSID”, type ‘home-clear’, and check ‘WPA Personal’. Again, type a good, long passhprase for your wireless network.
Click ‘ADVANCED OPTIONS’
Check the box that says ‘Use VLAN’ and type ’30’ into the ‘VLAN ID’ field.
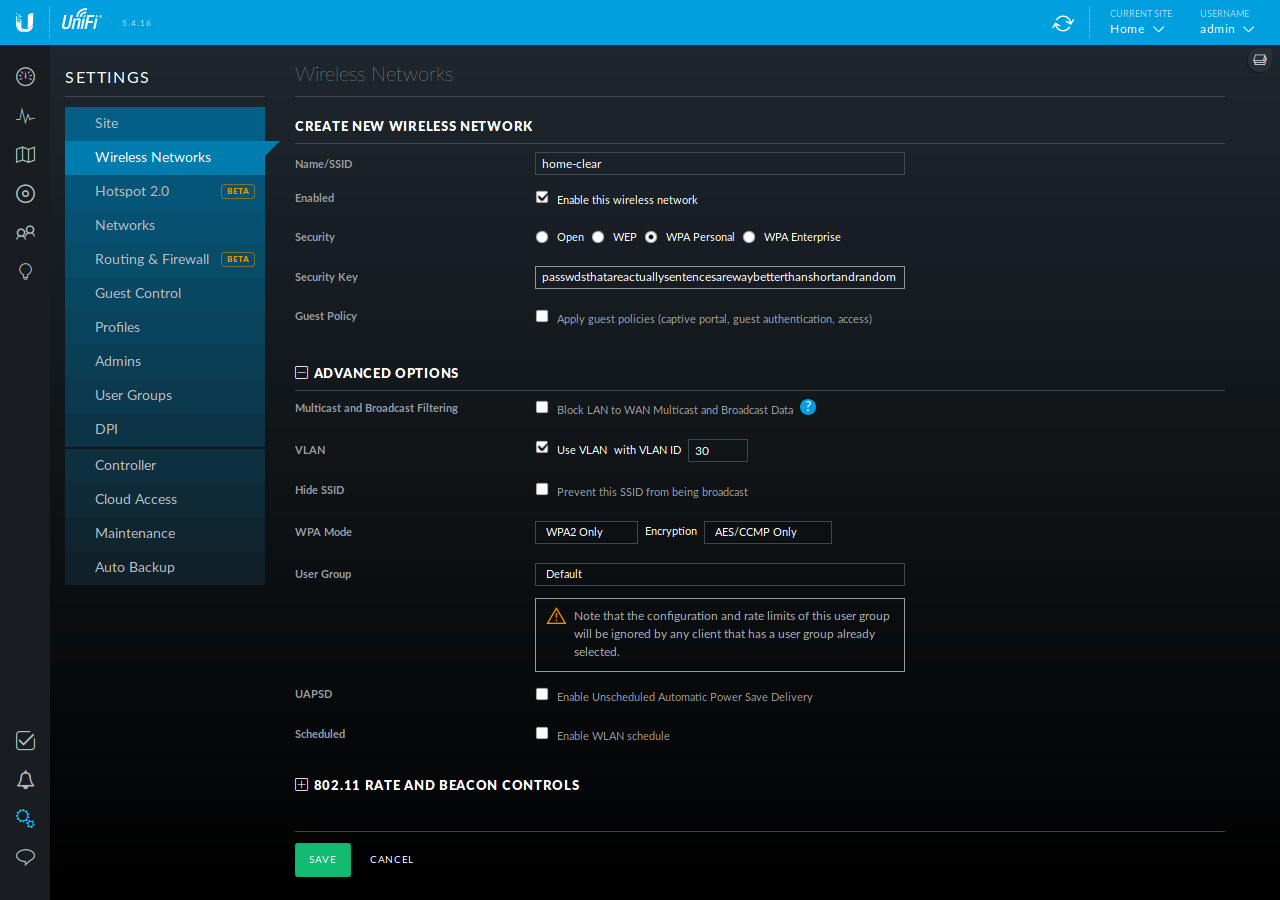
Click ‘Save’
You should now see both wireless networks (‘home’ and ‘home-clear’) in your “Wireless Networks” section of your “Settings” in the Unifi Controller WUI.

Add AP
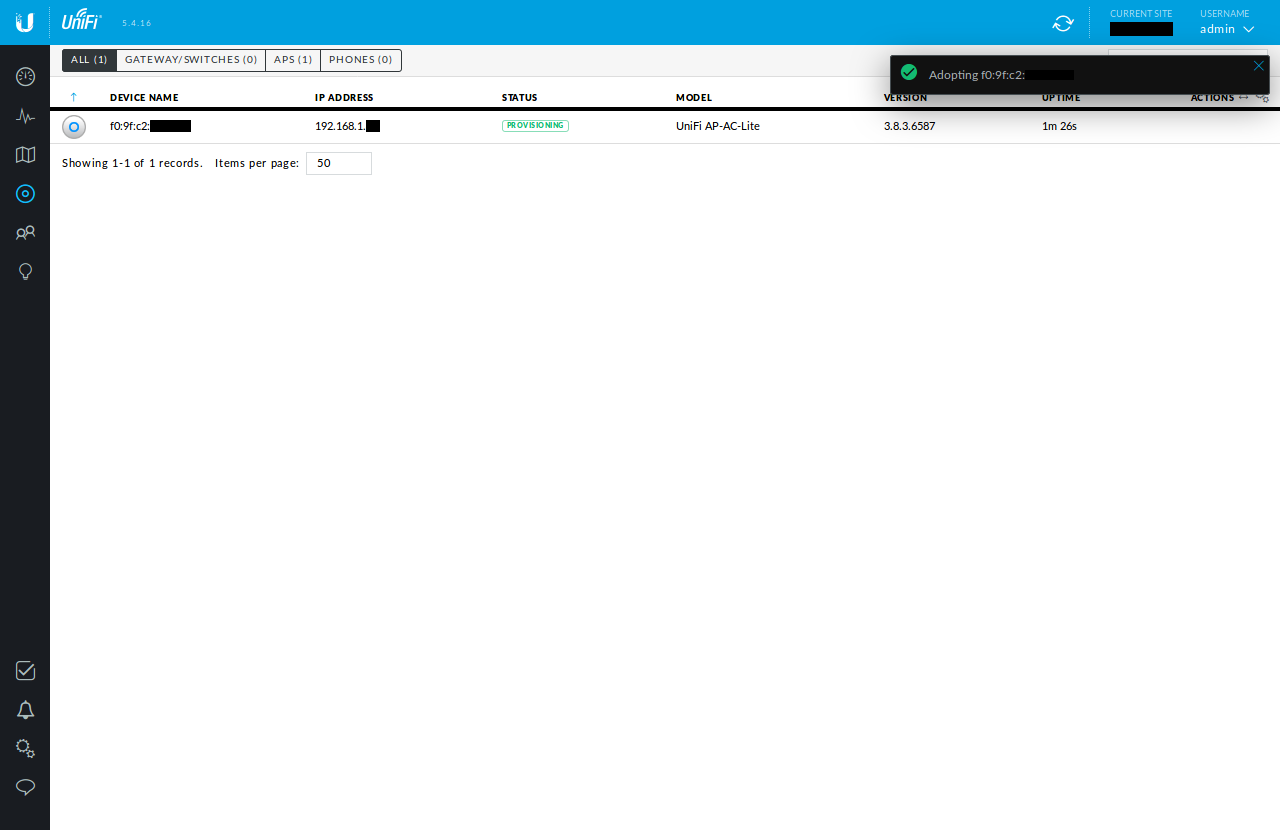
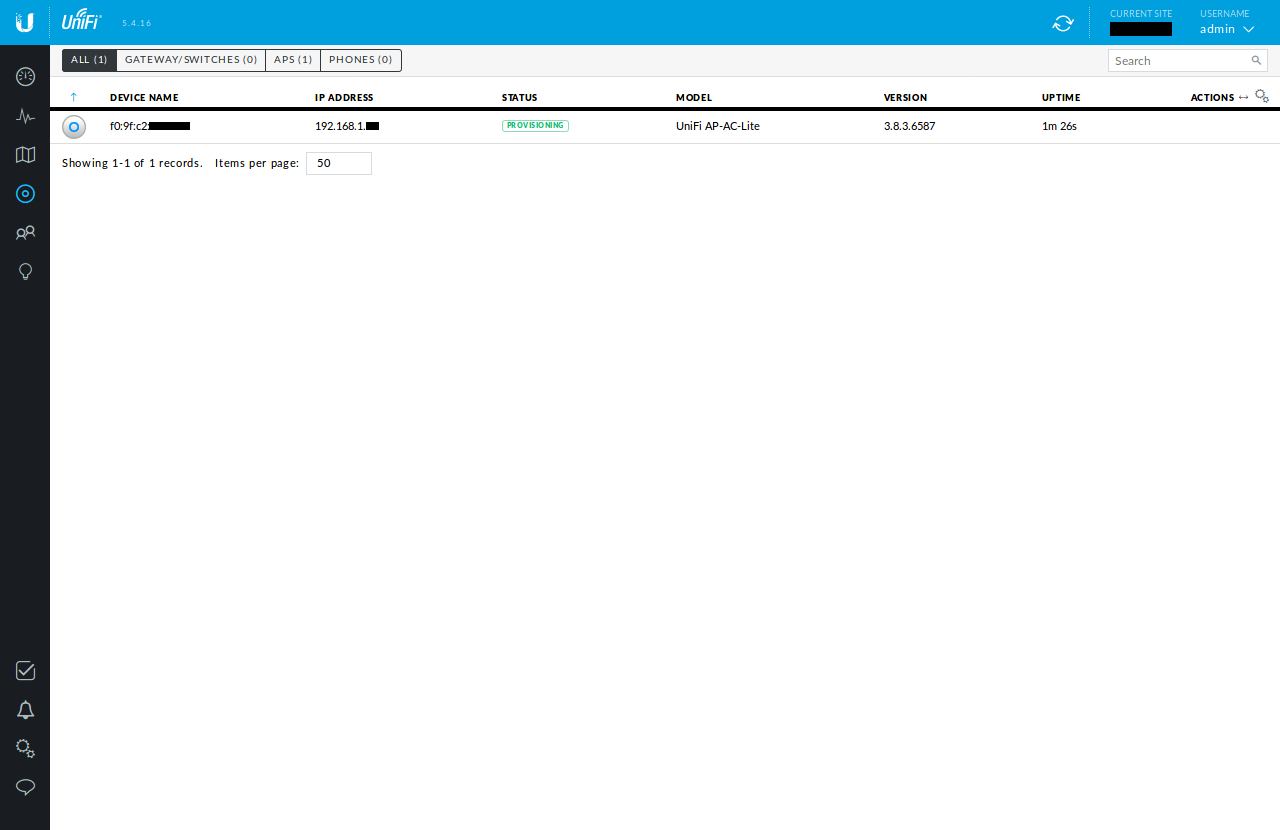
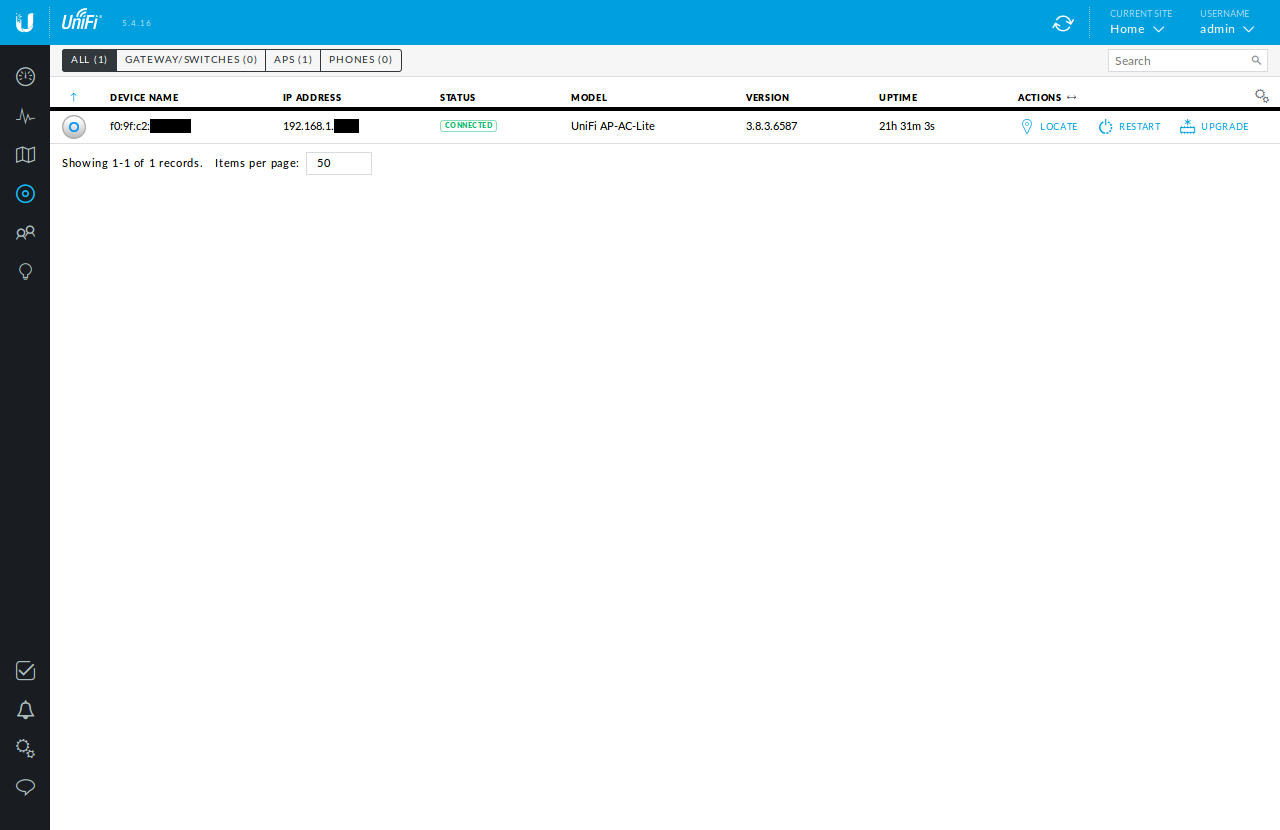
Browse to the “Devices” section of the Controller WUI. You should see your AP. Click the “Adopt” link on the right.

When the node is finished provisioning, you should be able to connect to your network over wifi. Finally, you can unteather yourself, brew a cup, and recline in a nice comfy chair to finish the config wirelessly.
Upgrade APs
Before exiting the controller software, check to see if your AP has an “UPGRADE” available. If so, go ahead and update their firmware by clicking the button.
ER-X OpenVPN Client Configuration
Unfortunately the ER-X doesn’t have a GUI for configuring an OpenVPN client (note that this router also supports setting up an OpenVPN server, so that you can securely connect to your home network when you’re away–this is distinct from the OpenVPN config we’re implementing in this article).
To create a virtual tunnel interface that sends encrypted traffic to cryptostorm (or another vpn provider) on the Ubiquiti EdgeRouter-X, we must do so from the command-line. This guide assumes you’re running ubuntu linux, but any OS with an ssh client should work.
Add Cryptofree Config Files to ER-X
First, ssh into your ER-X router using the same username & password you use to login to the WUI
ssh admin@192.168.1.1
Now, create the vpn connection. Note that cryptofree is free, so the username & password don’t matter-ish. They do need to be set, but they can be set to anything.
cd /config

# create bogus passwords file
echo -e "bogusUser\nbogusPass" > /config/cryptofree_pass.txt

# download the cryptofree openvpn file
curl -O https://raw.githubusercontent.com/cryptostorm/cryptostorm_client_configuration_files/master/cryptofree/cryptofree_rsa-udp.ovpn

# add our password file to the config
sed -i '/auth-user-pass/d' cryptofree_rsa-udp.ovpn
echo "auth-user-pass /config/cryptofree_pass.txt" >> cryptofree_rsa-udp.ovpn

# Add route-nopull so we can setup our routes, not the server. This is
# necessary since cryptstorm wants all our traffic to them, but in-fact we want
# some traffic to rote to the ISP (our vlan on the 'home-clear' wifi network)
echo "route-nopull" >> cryptofree_rsa-udp.ovpn

# add openvpn to er-x config
configure
set interfaces openvpn vtun0 config-file /config/cryptofree_rsa-udp.ovpn
commit
save
exit
After the ‘commit’ step above, your router will create a vtun0 interface & connect to the VPN. ‘save’ makes it persistent across reboots.
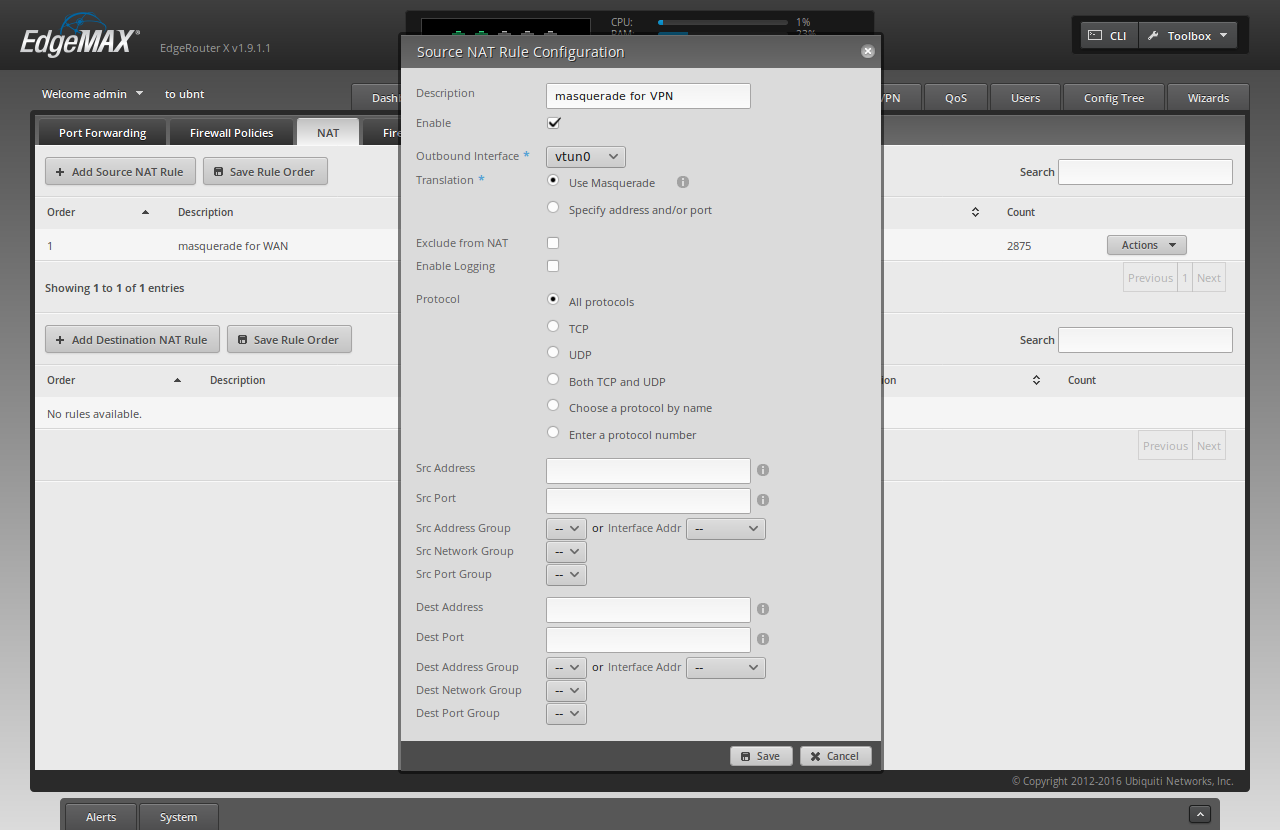
Masquerade for vtun0
Back in the router’s WUI, click on the ‘Firewall/NAT’ -> ‘NAT’ tab.
Click ‘Add Source NAT Rule’
For ‘Description’, type ‘masquerade for VPN’
For ‘Outbound Interface’, select ‘vtun0’.
Check both ‘Use Masquerade’ and ‘All protocols’
Click ‘Save’
You should now be connected to the VPN, even though no traffic is forced through it yet. Let’s set that up now.
Force traffic through VPN
Finally, let’s setup [a] our LAN to use a new firewall rule SOURCE_ROUTE, [b] the SOURCE_ROUTE firewall rule that uses a custom route table 1, and a custom route table 1 that forces all traffic out to the ISP modem.
Unfortunately, I haven’t found a good way to do all these things through the GUI, so hop back to the terminal & type the following into the router’s CLI over ssh:
configure
set interfaces switch switch0 firewall in modify SOURCE_ROUTE
set firewall modify SOURCE_ROUTE rule 1 description "traffic from LAN goes through VPN"
set firewall modify SOURCE_ROUTE rule 1 modify table 1
set firewall modify SOURCE_ROUTE rule 1 source address 192.168.1.0/24
set protocols static table 1 interface-route 0.0.0.0/0 next-hop-interface vtun0
commit
save
exit
Congrats! All your traffic should be flowing through the VPN. Now let’s setup that second wifi network & fix DHCP.
Create Switch0.30
To create a new switch for the VLAN traffic coming from the ‘home-clear’ wifi network, go the the “Dashboard” tab of the ER-X WUI, and click “Add Interface” -> “Add VLAN”
For “VLAN ID”, type ’30’
For “Interface”, select ‘switch0’
For “Description”, type “home-clear”
For “Address”, select “Manually define IP address”, and type “192.168.30.1/24”
Click “Save”

Your Dashboard should now show “switch0.30” in the list of Interfaces.
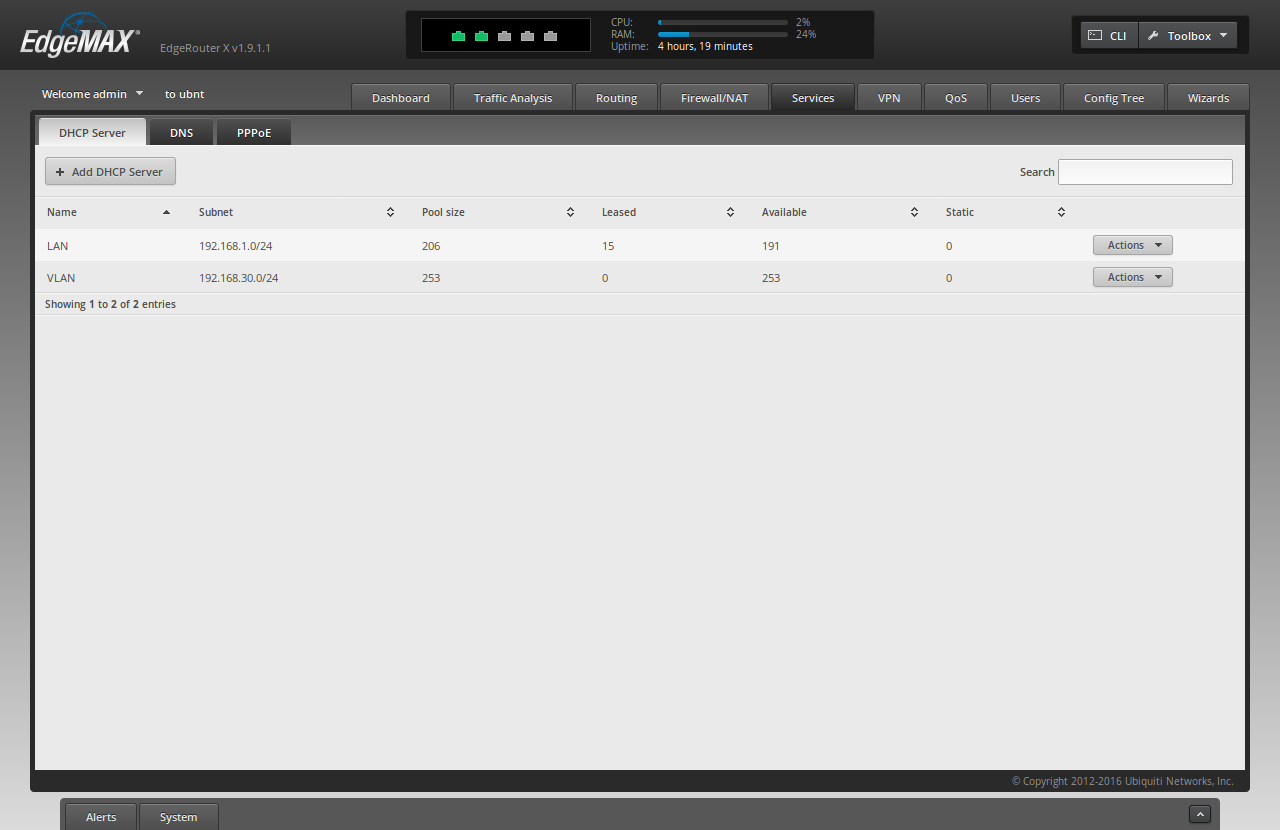
Create DHCP Server for Switch0.30
Because we created a distinct subnet for our VLAN, we need to create a distinct DHCP server for the 192.168.30.0/24 network. To do so, Click the “Services” tab in the ER-X WUI.
Click “Add DHCP Server”
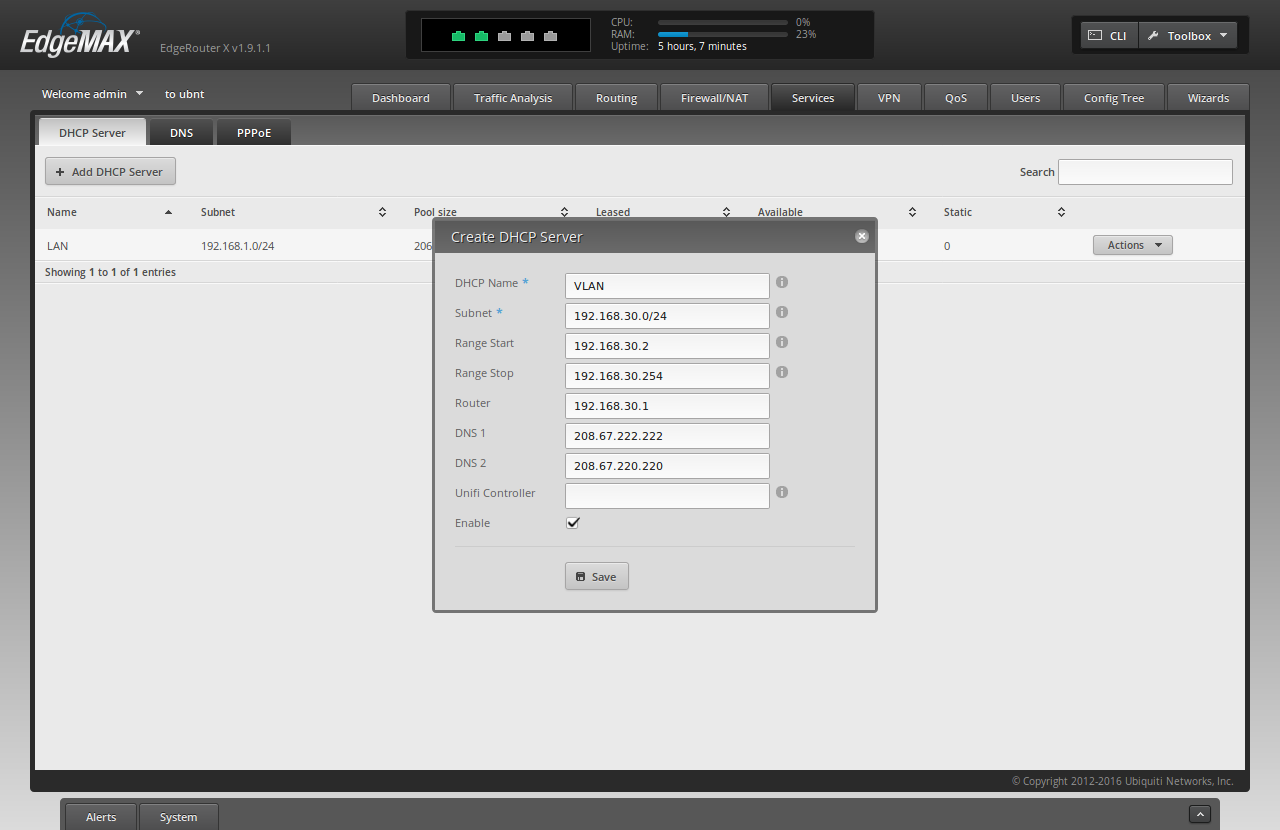
For “DHCP Name” type ‘VLAN’
For “Subnet” type ‘192.168.30.0/24’
For “Range Start” type ‘192.168.30.2’
For “Range Stop” type ‘192.168.30.254’
For “Router” type ‘192.168.30.1’
For “DNS 1” type ‘208.67.222.222’
For “DNS 2” type ‘208.67.220.220’
Click “Save”
Change DNS Servers for LAN
Let’s also update the DNS servers for our LAN to use OpenDNS, so that we’re not calling back to the ISP from our VPN (which actually may not work at all).
For the “LAN” DHCP Server, click “Actions” -> “View Details”

Erase the contents of “DNS 1” and “DNS 2”
For “DNS 1” type ‘208.67.222.222’
For “DNS 2” type ‘208.67.220.220’
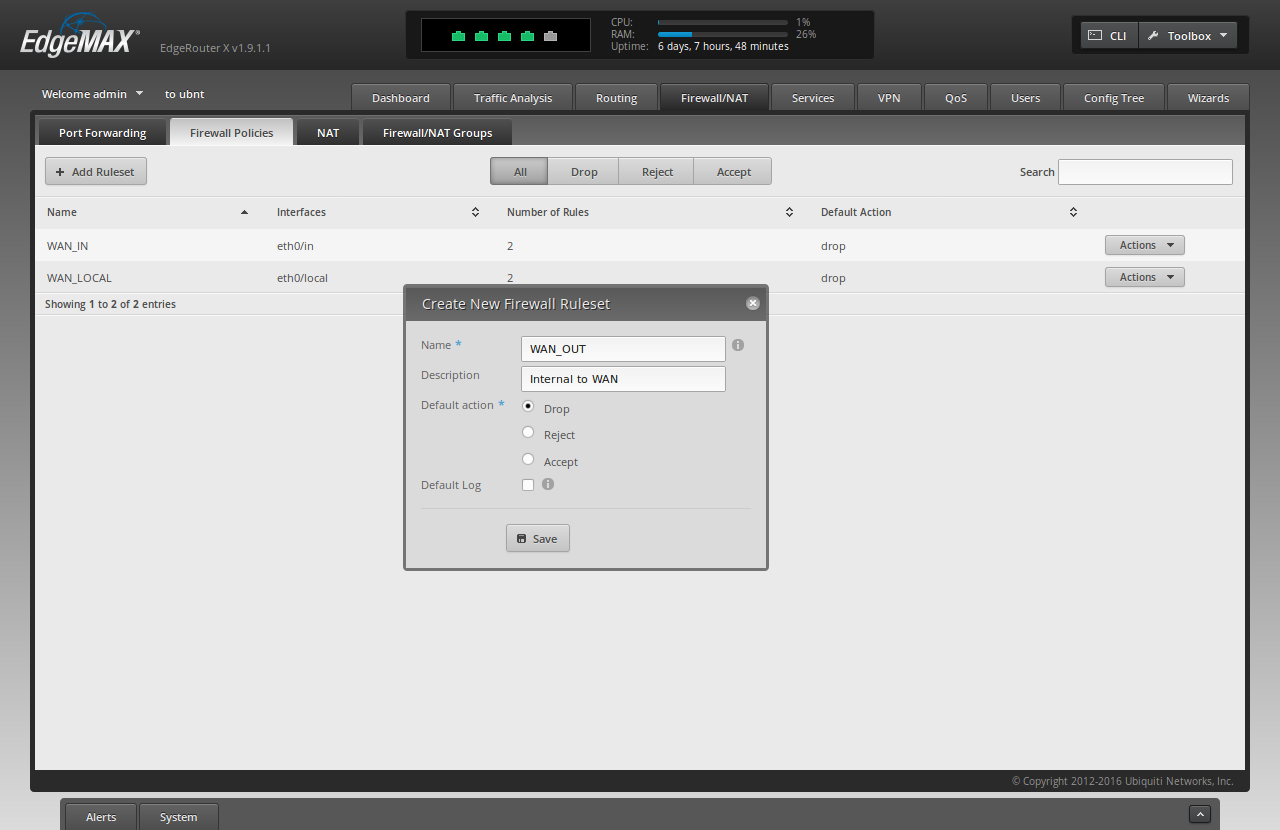
Create “VPN Kill Switch”
A VPN Kill Switch is a mechanism to prevent your Internet traffic from flowing directly to your ISP when it’s expected to be flowing through a VPN first. The “kill switch” will essentially shut off your Internet access if your vpn tunnel experiences connectivity issues, rather than send your packets straight to the ISP (bypassing your VPN).
To create the VPN Kill Switch go to “Firewall/NAT” -> “Firewall Policies” in the Controller WUI.
Click “Add Ruleset”
For “Name” type ‘WAN_OUT’
For “Description” type ‘Internal to WAN’
For “Default Action” choose ‘Drop’
Click “Save”
After saving, edit the empty ruleset by clicking “Actions” -> “Edit Ruleset” on the new “WAN_OUT” line.
Click “Add New Rule”
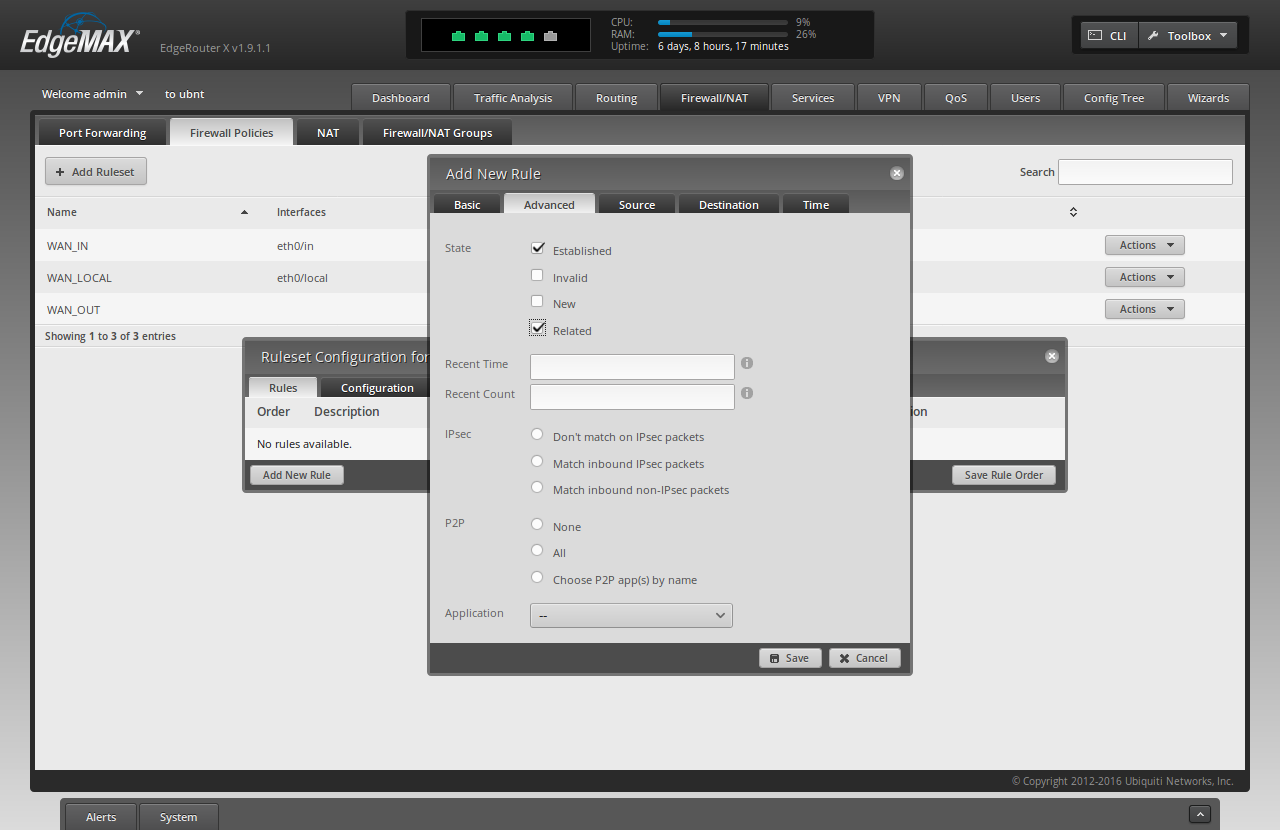
For “Description” type ‘Allow established/related’
For “Action” choose ‘Accept’
Click the “Advanced” tab
Check the “Established” checkbox
Check the “Related” checkbox
Click “Save”

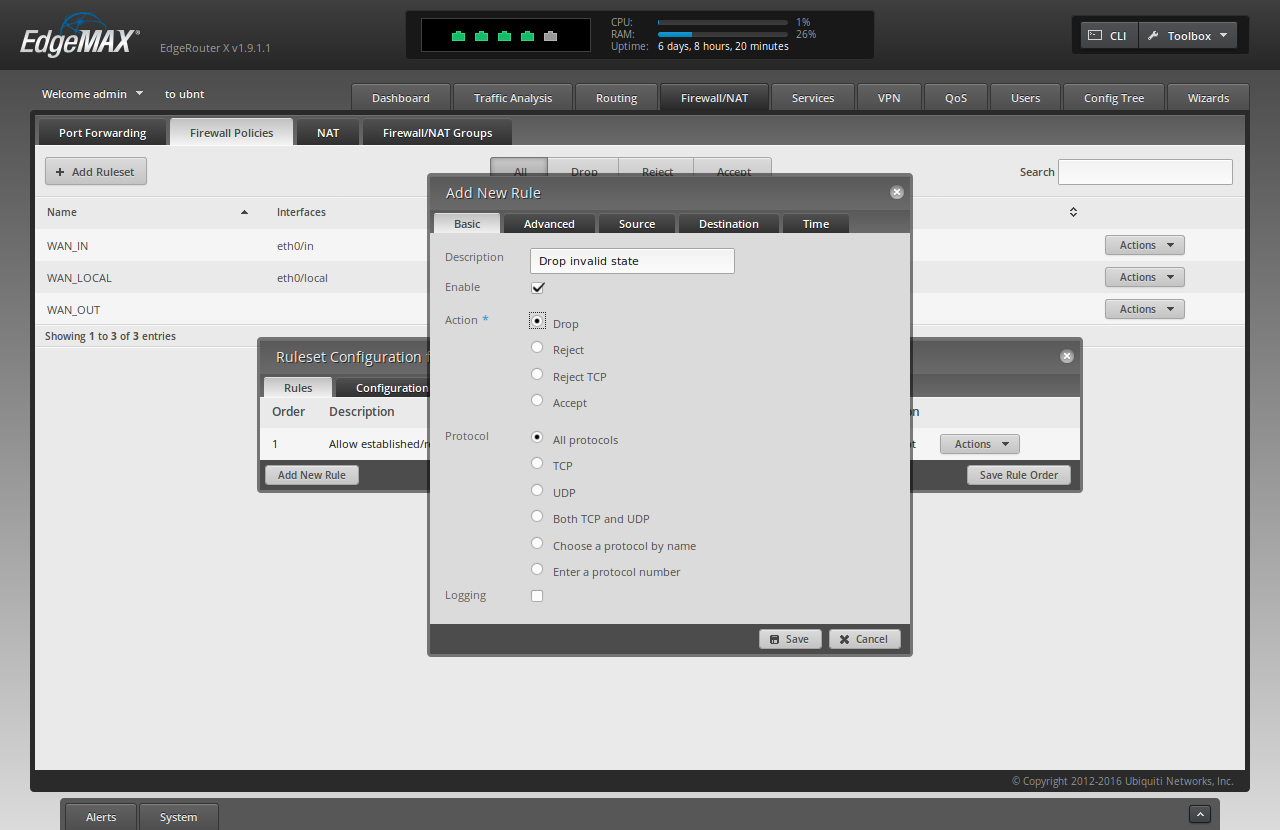
Click “Add New Rule”
For “Description” type ‘Drop invalid state’
For “Action” choose ‘Drop’
Click the “Advanced” tab
Check the “Invalid” checkbox
Click “Save”

Click “Add New Rule”
For “Description” type ‘permit vlan to bypass vpn’
For “Action” choose ‘Accept’
Click the “Source” tab
For “Interface Network” choose “switch0.30”
Click “Save”


You should now see the following summary of the 3 rules created above
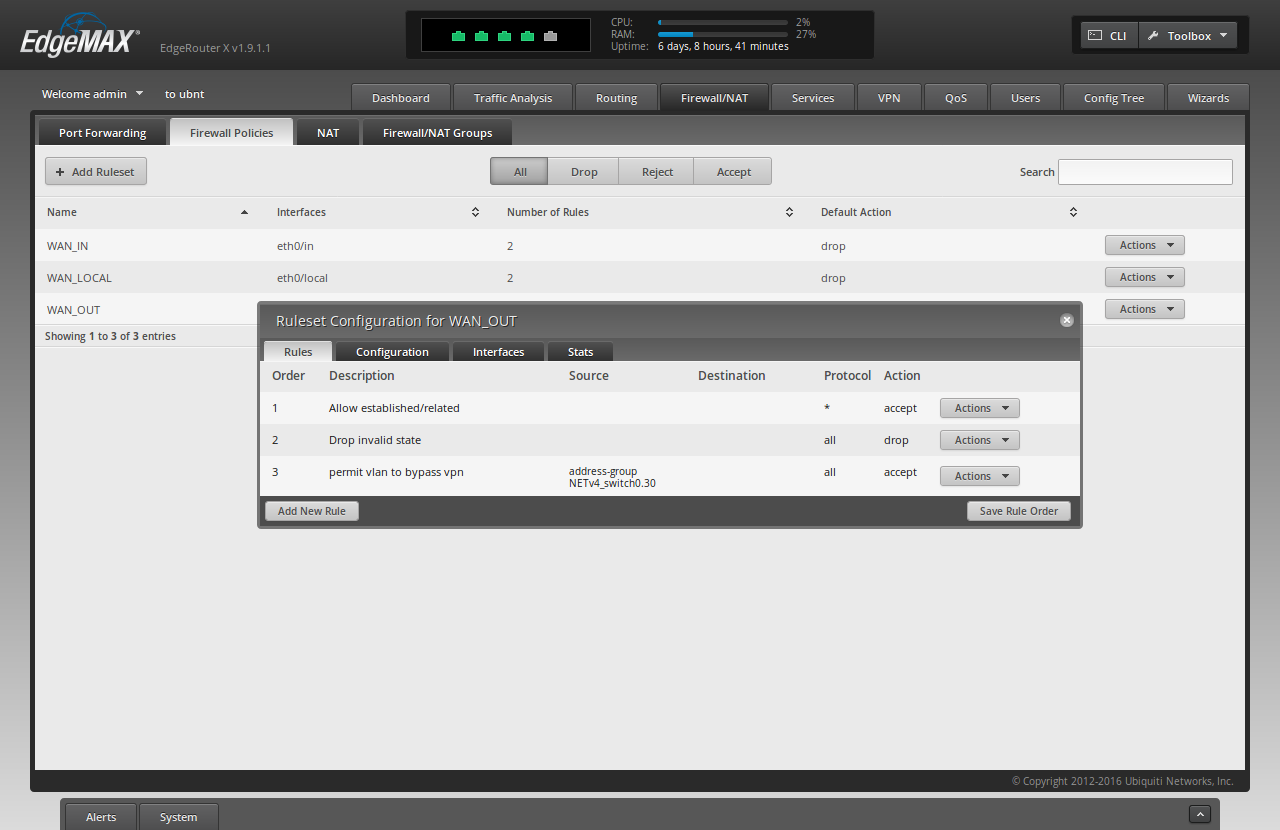
Click the “Interfaces” tab
For “Interface” choose ‘eth0’
For “Direction” choose ‘out’
Click “Save Ruleset”
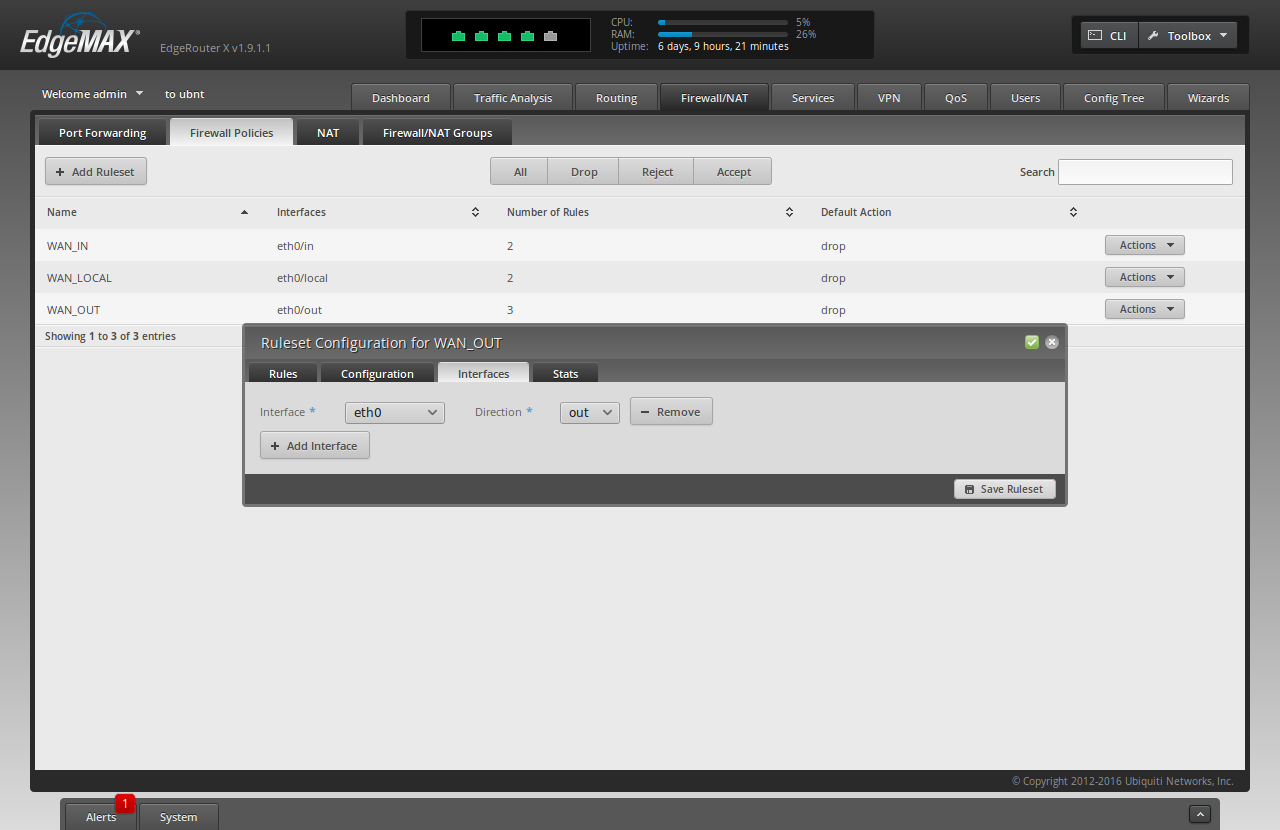
Click the “x” to close the “Ruleset Configuration for WAN_OUT” window. That’s it! Your router’s vpn kill switch is setup.
Note that (because of the firewall rules created earlier) it is not necessary to create a rule in this ruleset specifically for the traffic with source = vtun0.
Testing
Congrats, you’ve finished setting up the Netflix-safe, Whole House VPN on your router! To verify that it works:
- Connect to the ‘home-clear’ wifi network & google “whats my ip geo” to find a website that will tell you the Internet IP Address that they see + where they think you are geographically located. Write down the results.
- Connect to the ‘home’ wifi network & visit the same site as above. Compare your results.
My favorite website for this is currently ifconfig.co–which can also be used with curl on the command line.
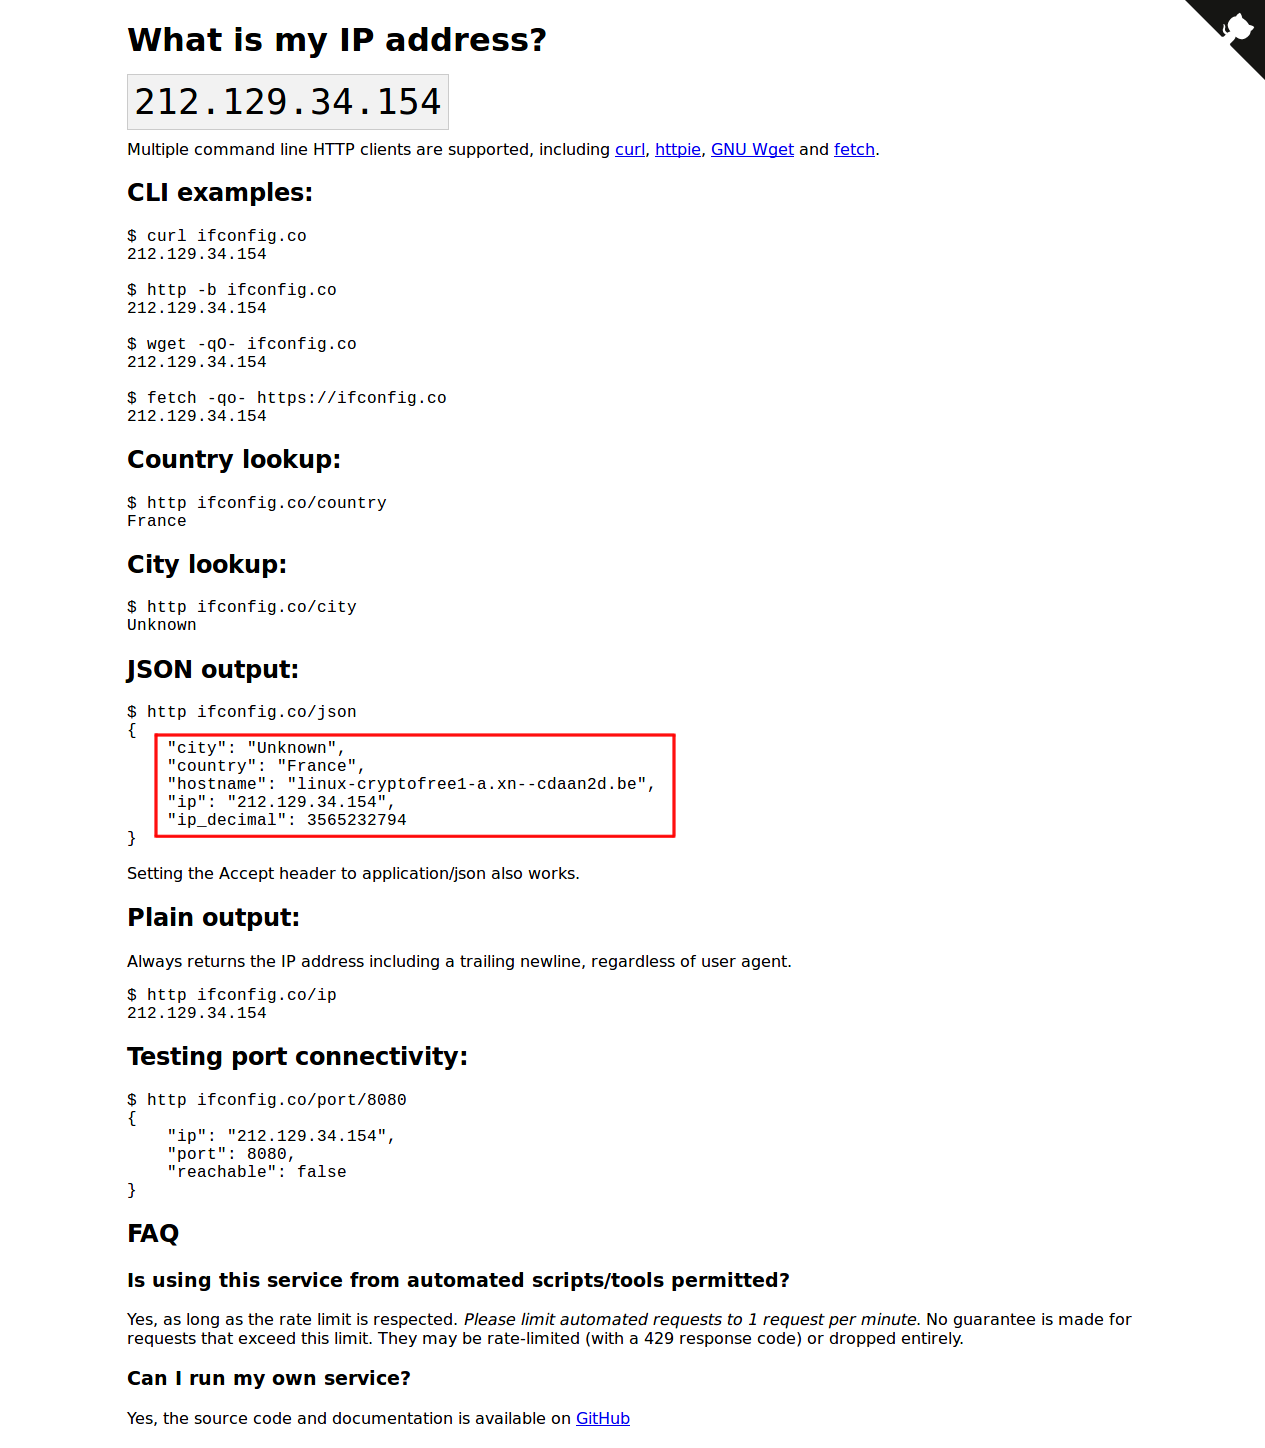
If the results differ on both networks, then you’re all set! Note that cryptofree currently routes out through France at the time of writing.
Change to Paid CryptoStorm
This section will describe how to update your config if you decide to purchase a token for uncapped connections to the CryptoStorm VPN service.
After you pay for your subscription to CS, they will display for you (and email you) your new token. According to CS, they keep no records of this token being offered. And to further obfuscate your identity (by decoupling [possibly anonymous] payment information from OpenVPN authentication credentials), your OpenVPN credentials consist of a strong, cryptographic hash of the token that CS gave you. This hashed token is your username. Your password can be anything (their guide recommends ‘password’, so that’s what we’ll use here).
In this example, the token that CS gave you after payment is ‘CHANGEME’. You should change this to the token they gave you. The part that says ‘password’ (as explained above) should be kept as ‘password’.
First, store your CS hashed token to a file on the router. Run the following on the CLI of the router via ssh:
echo -n 'CHANGEME' | sha512sum | awk '{print $1}' > /config/cryptostorm_pass.txt
echo 'password' >> /config/cryptostorm_pass.txt
Next, download & configure the cryptostorm openvpn config for linux udp. Note that this is different from the cryptofree config. Also note that if you poke around the git repo, you can choose which geo-regional exit nodes you want to use.
Run the following on the CLI of the router via ssh:
cd /config
curl -O https://raw.githubusercontent.com/cryptostorm/cryptostorm_client_configuration_files/master/rsa/Balancer_UDP.ovpn
sed -i '/auth-user-pass/d' Balancer_UDP.ovpn
echo "auth-user-pass /config/cryptostorm_pass.txt" >> Balancer_UDP.ovpn
echo "route-nopull" >> Balancer_UDP.ovpn

configure
delete interfaces openvpn vtun0
set interfaces openvpn vtun0 config-file /config/Balancer_UDP.ovpn
commit
save
exit
Warnings, Limitations, & Pending Improvements
This section will describe what this solution does not provide and some ways it could be improved.
Not a suitable replacement for TAILS

Unfortunately, there’s no ‘security’ button on your keyboard. Not only is nothing 100% secure, but this Whole House VPN solution is necessarily far from achieving an acceptable amount of privacy for many users.
If you are an investigative journalist, activist, or political dissident looking to safely browse the internet without being tracked by an oppressive regime, this solution is not for you. If you’re concerned that an adversary having access to your Internet activity could cause pain, suffering, or loss-of-life, then you should not trust this system to protect you. Instead, you should use TAILS.
If, however, you’re afraid that Verizon, AT&T, Comcast, Time Warner, or Cox will be selling your queries to WebMD about Rheumatoid Arthritis, and you have a legitimate fear that your future insurance prices will rise because of it, this solution may help you. But you probably should still use TAILS if you are especially concerned about it.
DNS Leaks
I haven’t yet put an sniffer between the router & the modem to see if DNS queries are escaping from the regular (non-vlan) network in cleartext. The goal is to have all packets, including DNS, be encrypted & sent to the VPN server, decrypted by the VPN server, and then passed to the DNS server. Even if we’re using ordinary DNS (instead of, say, dnscrypt), the DNS server should only know that a cryptostorm user did a lookup for a given domain name.
The fear is that the DNS query gets passed to the router, which sends it to the ISP’s DNS servers instead of through the VPN tunnel. This would tell the ISP which websites we’re going to and when. This metadata alone is significant, and could lead to death in an opressive regime.
Bandwidth & Latency Results
This setup does meet my requirements, and I’m going to keep it.
However, I was shocked how poor my bandwidth was using cryptostorm. I changed my openvpn config to use a cryptostorm server that was less than a few hundered miles from me. I also switched to using openvpn over udp, which helped.
Overall, I got great latency of ~20 ms.
But my bandwidth on my actual 100 Mbps up & down fiber line couldn’t break 15 Mbps. For a VPN service that caters to torrenters, this was a big let down. That said, I couldn’t detect a decrease in “usage performance” when just browsing the web. You’d notice it when downloading ISOs for your favourite linux disto, however.
Further Reading
If you’d like to learn more about the background of this article, I recommend the following additional resources:
- https://community.ubnt.com/t5/EdgeMAX/RFC-Howto-Guide-for-Whole-House-VPN-with-EdgeRouter-X/m-p/2041437
- https://en.wikipedia.org/wiki/Interdiction#United_States
Related Posts


Hi, I’m Michael Altfield. I write articles about opsec, privacy, and devops ➡


I was looking to do exactly this last year when I purchased my rpi3 and was never able to get it to work properly. I may invest in some new hardware and give this a go.
Odd as it may be, I was trying to get this setup so that I could manage the whole house with a single connection because of cryptostorm.
Now that my one yeaar subscription to another service is up I will be trying this shortly
This was great, thank you for writing it! Exactly what I was looking for.
I set it up so that VLAN 30 gets routed to the VPN (using PrivateVPN) and untagged traffic goes in the clear. The killswitch was slightly different but figured that out as well.
Unfortunately I have not been so successful
all goes well until I commit then I rec
[ interfaces openvpn vtun0 ]
OpenVPN configuration error: Failed to start OpenVPN tunnel.
I even tried latest config files from github as follows but same result
I am no linux expert so anty assist is welcome
ssh admin@192.168.1.1
cd /config
echo -e “bogusUser\nbogusPass” > /config/cryptofree_pass.txt
curl -O https://github.com/cryptostorm/cryptostorm_client_configuration_files/blob/master/cryptofree/cryptofree_secp521r1-tcp.ovpn
sed -i ‘/auth-user-pass/d’ cryptofree_secp521r1-tcp.ovpn
echo “auth-user-pass /config/cryptofree_pass.txt” >> cryptofree_secp521r1-tcp.ovpn
echo “route-nopull” >> cryptofree_secp521r1-tcp.ovpn
configure
set interfaces openvpn vtun0 config-file /config/cryptofree_secp521r1-tcp.ovpn
commit
Sorry missed Edgerouter firmware level
Currently running EdgeOSv1.10.9
sorted it I upgraded edgeOS
Currently running EdgeOSv2.0.0
this gave me openvpn2.4
used winscp to add my paid for config files (from a windows install of openvpn setup for CStorm) to /config
eg myconfig_UDP.ovpn and client.dat
ran following
echo “route-nopull” >> myconfig_UDP.ovpn
configure
set interfaces openvpn vtun0 config-file /config/myconfig_UDP.ovpn
commit
and it works
hope this helps someone
Glad you got it working, thank you for posting the solution here 🙂
How to configure to use VPN just for Netflix IP? And others via isp
Create Wireless Network panel has changed. There is no longer an option for \”Use VLAN with VLAN id.\” Has this been moved?
Should I create another “Network” and call it “VLAN”, and set the ID there to 30? And then specify that “home-clear” use “VLAN” network instead of “LAN” network?
Forgive me for getting frustrated. I just cannot seem to get this to work. I entered two comments yesterday, but they do not yet appear here, so apparently the moderator has not been able to review them. I moved onto the ER-X programming, and got stuck again. I first started with the Cryptofree account. I got the same error that Des got above. So I moved onto the paid Cryptostorm. I got a token. I tried the instructions for adding the paid Cryptostorm account. I am not certain, because I know not for sure, but I believe that I was unable to download the \”cstorm_linux-balancer_udp.ovpn\” file from the web page. I THINK I did not get it because when I type the \”sed\” command, it says the file cannot be found. Thanks so much for writing this article. I am hoping I am able to get this to work.
Hey Bill. Sorry, all comments require manual approval to prevent spam.
It looks like the cryptostorm free file moved. The one in the article above is a 404
https://raw.githubusercontent.com/cryptostorm/cryptostorm_client_configuration_files/master/cryptofree/cryptofree_linux-tcp.ovpn
If you check the repo from which the above link is downloading, you can see clearly that the file `cryptofree_linux-tcp.ovpn` doesn’t exist anymore. It looks like they divided it up based on the key type chosen:
https://github.com/cryptostorm/cryptostorm_client_configuration_files/tree/master/cryptofree
So this one might work for RSA + udp
https://raw.githubusercontent.com/cryptostorm/cryptostorm_client_configuration_files/master/cryptofree/cryptofree_rsa-udp.ovpn
I updated the article above. Please let me know if it works. Unfortunately I don’t have access to an ER-X right now, so I can only help to guide you. If you get really stuck, you might also be able to get help from the Ubiquiti Forums
https://community.ui.com/questions/RFC-Howto-Guide-for-Whole-House-VPN-with-EdgeRouter-X/90e7e699-10d9-4b80-a07d-38655bd78178
If you get this working, please post how here in the comments so it will help the next person following this guide as well 🙂
Thanks Michael.
Please see my messages from January 30 above. In the Ubiquiti Controller Windows program, the checkbox for Use VLAN with VLAN ID has been moved. What I did, and it worked, was create the first Wireless Network, and assigned it to network LAN. Before creating the second Wireless Network, I went to Networks panel, and added a second network called VLAN, ID 30, and the suggested IP range. I went to Wireless Networks panel and assigned home-clear to that network.
Using your updated instructions, I used the file cryptofree_rsa-udp.ovpn. After a few mistypes, I got the two networks to work as you describe. Wireless network home goes through the cryptofree server, and wireless network home-clear bypasses this. So far so good.
I then had a problem with my paid account. I was able to view the repository, and saw that your suggested file cstorm_linux-balancer_udp was absent. I tried a couple of different files, and followed the instructions to change to the paid account (of course to get a faster speed). At the commit command, it threw a message, but I cannot remember what it said. Something about invalid configuration.
So if you could suggest the correct file, I will try to apply the instructions again. I will let you know how it comes out.
PS I would like to attach to a server in the US. Is there a balanced file that only uses US servers? If I have to specify a city in order guarantee that connect to a server in the US, I would like to connect to a server in Chicago. And I assume I should use UDP, because this is what I used for cryptofree.
I decided to try it again. I used your exact instructions for cryptostorm, using US-Chicago_UDP.ovpn. It worked perfectly, no errors. I do not know what I did differently. It connects to the Chicago server. Again, thank you.
It works great, but I am only getting 10Mbps up and 10Mbps down, whereas Comcast is giving me 20Mbps up and 350Mbps down. I am working with them to increase the speed.
Thanks Michael,
the VPN- an KillSwitch-part worked like a charm (using ovpn-servers)!
What I’m terribly struggling with: Home-clear does not work at all. I have setup switch0.10 and dns for 192.168.10.0/24. If I try to connect via wifi, the router becomes unresponsive. If I connect via static IP 192.168.10.10, I cannot ping or anything (ping 8.8.8.8 does not work).
edgerouter-X with v2.0.9-hotfix2 firmware
Any ideas? Thanks!
got it sorted out. In uniFi 6.2.26, do NOT add a new VLAN Network. Instead, go to Advanced Settings / Network Isolation and define Home-clear. Very important, also define a switch Port with Native Network “home-clear” and Tagged Network “LAN”. If you do not do this, Edgerouter will hang.
Another question, now my home-clear wifi works, but traffic is still going thru the VPN instead ISP. Should I add a new firewall rule, to force traffic from VLAN directly to WAN?
thanks again for your great article!
Hey Ulrich, thanks for posting the changes to UniFi v6.2.26 for others!
Unfortunately I don’t have access to an ER-X anymore, but it looks like you decided to setup a VLAN tag id = 10 for home-clear? Because the setup described in this article tags it as VLAN tag id = 30 with 192.168.30.0/24 on ‘switch0.30’. So I’d recommend double-checking that you did all the necessary substitutions here.
The relevant section that would pass the ‘home-clear’ VLAN’d traffic to the ISP instead of the VPN is ‘Create “VPN Kill Switch”‘. Make sure the last rule (“permit vlan to bypass vpn”) matches the switch for the VLAN tag you used.
Thanks for the reply. I have only one VLAN and the third rule matches the switch0.10 When I disable vtun0, the Killswitch stops the encrypted ssid and the clear ssid still has internet-access. So the rule works. Ifonfig.co shows my normal ISP. When I enable vtun0, the clear ssid traffic goes back thru vpn. Should I add a second source rule and force switch0.10 to eth0?
Thanks!
Hey Michael,
I\’ve triple-checked your commands again, and finally I\’ve found my mistake. I did not add \”route-nopull\” to my /config/user-data/ovpn.ovpn config-file. Now home-clear works as expected!
So, if someone does not use cryptostorm servers (like me), for the love of god still read Michael\’s openvpn commands! It will save days of debugging.
—–BEGIN PGP SIGNED MESSAGE—–
Hash: SHA256
Just an FYI, cryptostorm no longer offers a free service. Our DNS and DNSCrypt servers are still free to the public, but the VPN itself is now limited to paying customers only. An explanation of why is on https://cryptostorm.is/cryptofree
As for your comment about the slow speeds, our network has expanded a lot since this article was first written in 2017. Back then some of our servers were 100Mbps, but these days everything is either 1Gbps or 10Gbps.
—–BEGIN PGP SIGNATURE—–
iQIzBAEBCAAdFiEETYf5hKIig5JX/jalu9uZGunHyUIFAmXwwXAACgkQu9uZGunH
yULbwA/+Lp72A2A4maEZAUoliCHxbsr63/RLjjJoivKG1AjELEG14tUX1lO4dJAg
pfWv89KlOEGHtUOq4CBBl5MzguF6NsRdIc0kwLbVujFRTfEE9+el+eWTUPwnYD+b
joJy9ZDHCDTMHZVEVozcs6IixAhdXRg44+OO745wODozdMcwsbkKA+ZHlHkwKOJG
Avtv10QqIOqVqn2idDQ7XQeizff0CUPaUmt2PQdDmf5cc3P0HUA/3tC1UmhalXuJ
poJKxWuxksUpmpifn0R0LBXNbolLHkQ9SzP3GjMYjmPVkljG9LPf0Vr5y2iNU60b
NKeWr3p8cfXsB/nHQcNxgPPWB5zBzCHYpH23yOrBecvHmfqa5Pn4GiIaq9Qod7qr
ACmpK42TpFb1fokKxTCgOMwENwQjudRdhrDUZa9QkMz21XLcutnYNkp8KBzvsEZK
m/PXmpFduOV5lZIlxClT6IRt1HEowv0HcKIzkWmHBvjiw4EPZL1X6V+xh+RDudrW
J9KPDIqp/WHuYyxgkl5vFnDiNaAjNv0jOepF0GAEFd4C159kJNN4u2c4JN3o3uNE
i7m1wGGnWUw19yOHFkWPyx1a8Oo+2QLkTrx1tiBN81z0BzT/aSO5uDwMOcJbapQH
jVsD63osBHjkQncHtQnwCYnQrBviqNqnr/+BCYjOdK2R48g5sI8=
=p7h5
—–END PGP SIGNATURE—–
Thanks for the clear and detailed explanations