This guide will show you how to generate and view XHProf reports of your WordPress Site.
This is useful so you can drill-down and see exactly how many microseconds each of your scripts and functions (themes & plugins) are running when generating a page — slowing down your website visitors’ page load speed.
Intro
Profiling is a critical tool for debugging the performance of your web application in production.
XHProf was originally developed by Facebook to profile (and optimize) their PHP web application (facebook.com). It was open-sourced in 2009.
Facebook no longer maintains XHProf, and as development continued past PHP7, the XHProf code rot lead to a number of XHProf forks, including:
- https://github.com/phacility/xhprof
- https://github.com/preinheimer/xhprof
- https://github.com/patrickallaert/xhprof
- https://github.com/longxinH/xhprof
- https://github.com/tideways/php-xhprof-extension
In this guide, we will be using the XHProf fork maintained by Tideways — as it is available in the Debian repos and therefore can be securely downloaded & installed without downloading & compiling code from the Internet.
Assumptions
Versions
This guide was written in June 2022, and it uses the following software and versions:
- Debian 11 (bullseye)
- Apache 2.4
- WordPress 5.9.3
- php-tideways v5.0.4-2
- longxinH/xhprof v2.3.5
If you’re using a different OS, web server, wordpress, or xhprof versions, then adaptations to the below commands & files may be necessary.
WordPress Document Root
This guide assumes that your wordpress document root is located at the following directory
/var/www/html/wordpress/htdocs/
If your wordpress install is located in a distinct directory, then adaptations to the below commands will be necessary.
xhprof-html Document Root
This guide assumes that you will install a new `xhprof-html` vhost with a document root at the following directory
/var/www/html/xhprof/htdocs/
If you’d like to keep your web server’s document roots organized in a distinct path, then adaptations to the below commands will be necessary.
XHProf File Storage Dir
This guide assumes that you will be writing your `.xhprof` files to the following directory:
/var/www/html/wordpress/xhprof/
If you’d like to store your `.xhprof` files in a distinct path, then adaptations to the below commands will be necessary.
Installing XHProf
Most XHProf guides on the ‘net tell you to clone some random git repo and then (without doing any cryptographic authenticity nor integrity checks), proceed to compile binaries on your machine, then run `make install` as root.
There are numerous supply chain risks in blindly trusting public publishing infrastructure like that.
As such, the fork of XHProf that we choose to use for this guide is the only one that can be securely downloaded from the Debian repos using apt: `php-tideways`
Install Debian Packages
Of course, you should already have a functioning apache2 web server installed with php modules installed & enabled
sudo apt-get install apache2 libapache2-mod-php php-common
And to install the `php-tideways` extension, run
sudo apt-get install php-tideways
The above php-tideways package should have:
- installed the
tideways_xhprof.somodule on your system and - added the
tideways.inifile to be dynamically added to your main PHPphp.iniconfig file
For a list of files added to your system by installing the `php-tideways` module, run
sudo dpkg-query -L php-tideways
Finally, restart apache to apply the config changes
sudo systemctl restart apache2
You can also confirm in the CLI that the tideways module is enabled in PHP with the following command:
root@host:~# php -m | grep -i tideways
tideways_xhprof
root@host:~#
Configuring WordPress to use XHProf
XHProf is a tool for profiling PHP Applications generally. As such, the official PHP documentation describing how to use XHProf usually says something like this:
<?php
tideways_xhprof_enable();

my_app()

$data = tideways_xhprof_disable();
file_put_contents( 'my_app.xhprof', serialize($data) );
So, basically:
- You need to enable XHProf with `
tideways_xhprof_enable()` at the start of your page load, - You need to disable XHProf with `
tideways_xhprof_disable()` (and collect its output) at the end of your page load, and - You need to write the output from the `
tideways_xhprof_disable()` function above to a file somewhere (for later analysis)
…but what does that mean for a wordpress site?
Well, one solution is to integrate it into your theme’s `header.php` and `footer.php` files.
But better than `header.php` is to put it at the end of your wp-config.php file — just before the `require()` for `wp-settings.php`.
And better than `footer.php` is to use PHP’s register_shutdown_function() to disable XHProf and save our results to the `.xhprof` file.
Profile only on-demand
Modify your `wp-config.php` file so that it looks like this at the bottom:
/* That's all, stop editing! Happy publishing. */

/** Absolute path to the WordPress directory. */
if ( ! defined( 'ABSPATH' ) ) {
	define( 'ABSPATH', __DIR__ . '/' );
}

# PHP profiling with tideways-xhprof
#  * https://tech.michaelaltfield.net/wordpress-xhprof/
if ( isset( $_GET['profile'] ) && $_GET['profile'] === 'secret-string' ) {
   tideways_xhprof_enable( TIDEWAYS_FLAGS_MEMORY + TIDEWAYS_FLAGS_CPU );
   register_shutdown_function( function() {
      $results = tideways_xhprof_disable();
      include_once( '/var/www/html/xhprof/htdocs/xhprof_lib/utils/xhprof_runs.php' );
      $XHProfRuns = new XHProfRuns_Default( '/var/www/html/wordpress/xhprof/' );
      $XHProfRuns->save_run( $results, date('Y-m-d\TH:i:s\Z', time() - date('Z')) );
   });
}

/** Sets up WordPress vars and included files. */
require_once ABSPATH . 'wp-settings.php';
The above code block will check to see if a GET variable named `profile` was defined and if it was set to `secret-string`. For example, if your wordpress website is available at https://wordpress.example.com/, then loading the following page will trigger XHProf to run and generate a timestamped `.xhprof` file in `/var/www/html/wordpress/xhprof/`
Note that running XHProf does add some performance penalty. Depending on your options, it could slow your site down 4% – 200%.
⚠ WARNING: To prevent Mallory from launching a DDoS attack on your website, you should probably change `
secret-string` above to some unique passphrase that only you know 🙂
Profile every 1,000 requests
Alternatively, you can capture a random 1 out if every 1,000 requests to your wordpress site by adding something like this to the bottom of your `wp-config.php` file
/* That's all, stop editing! Happy publishing. */

/** Absolute path to the WordPress directory. */
if ( ! defined( 'ABSPATH' ) ) {
	define( 'ABSPATH', __DIR__ . '/' );
}

# PHP profiling with tideways-xhprof
#  * https://tech.michaelaltfield.net/wordpress-xhprof/
if ( rand( 1, 1000 ) === 1 ) {
   tideways_xhprof_enable( TIDEWAYS_FLAGS_MEMORY + TIDEWAYS_FLAGS_CPU );
   register_shutdown_function( function() {
      $results = tideways_xhprof_disable();
      include_once( '/var/www/html/xhprof/htdocs/xhprof_lib/utils/xhprof_runs.php' );
      $XHProfRuns = new XHProfRuns_Default( '/var/www/html/wordpress/xhprof/' );
      $XHProfRuns->save_run( $results, date('Y-m-d\TH:i:s\Z', time() - date('Z')) );
   });
}

/** Sets up WordPress vars and included files. */
require_once ABSPATH . 'wp-settings.php';
Just make sure to periodically clean-out your XHProf File Storage Dir, as it will grow over time 🙂
XHProf File Storage Dir
Of course, we need to create the XHProf Storage Directory.
By default, XHProf generally likes to store your `.xhprof` files to the PHP `sys_temp_dir`, which is often system-wide readable & writable. That’s not very secure, so we should specify a more locked-down path.
We create the XHProf File Storage dir inside the wordpress vhost dir (but outside the document root). Make sure your web server has read/write access to this directory.
sudo mkdir -p /var/www/html/wordpress/xhprof/
sudo chown root:www-data /var/www/html/wordpress/xhprof/
sudo chmod 0770 /var/www/html/wordpress/xhprof/
xhprof_lib & xhprof_html
Simply installing `php-tideways` and updating your `wp-config.php` file with the code block above is not enough. We still need:
- To install the `
xhprof_lib` dir (note the `include_once()` above) - To install the
xhprof_html` dir to actually visualize and understand the `.xhprof` files (else you’ll just have to read an enormous array dumped to a file in plaintext)
xhprof_html
There’s a lot of fancy SaaS tools for capturing and visualizing web application profiling data at scale in the cloud. This guide doesn’t cover such solutions. What we use is `xhprof_html` — which is sometimes referred to as the “poor man’s XHProf GUI”
The original (no longer maintained) Facebook xhprof repo included a simple tool to drill-down and visualize the xhprof results saved to `.xhprof` files. It’s located in a directory called `xhprof_html`
Curiously, The tideways repo itself (forked from the original repo) does not include the `xhprof_html` directory (possibly because tideways is one of these businesses that sells xhprof visualization SaaS). Rather, the tideways website actually links you to the original Facebook repo to obtain the `xhprof_lib` & `xhprof_html` directories.
[tideways] stores the trace in your temporary directory which the default UI uses to look for data. Install the
xhprof_libandxhprof_htmldirectories from this repository into your webfolder and navigate toxhprof_html/index.phpto see a list of trace.(source)
xhprof_lib
I’ve read that the `.xhprof` file format is basically just the serialized output of the `xhprof_disable()`, but I had issues getting `xhprof_html/index.php` to read my `.xhprof` files written this way.
# this won't work
#  * https://stackoverflow.com/questions/72393257/xhprof-html-wont-show-run-report-no-xhprof-runs-specified-in-the-url
$results = tideways_xhprof_disable();
file_put_contents( '/var/www/html/wordpress/xhprof/' .date('Y-m-d\TH:i:s\Z', time() - date('Z')). '.xhprof' , serialize( $results ) );
Instead, I found that I needed to write the files using the `XHProfRuns_Default()`’s `save_run()` method.
# this will work
$results = tideways_xhprof_disable();
include_once( '/var/www/html/xhprof/htdocs/xhprof_lib/utils/xhprof_runs.php' );
$XHProfRuns = new XHProfRuns_Default( '/var/www/html/wordpress/xhprof/' );
$XHProfRuns->save_run( $results, date('Y-m-d\TH:i:s\Z', time() - date('Z')) );
As the `XHProfRuns_Default()` object is defined in `xhprof_lib/utils/xhprof_runs.php' file, this is why we need the `xhprof_lib/` dir.
vhost
Both `xhprof_lib` & xhprof_html` are available together in the same repo. Here we use the `longxinH` fork because it seems to be the most maintained fork of xhprof at the time of writing.
First, we create a new web server document root for the vhost.
sudo mkdir -p /var/www/html/xhprof/htdocs/
Now we checkout the xhprof git repo into this directory
cd /var/www/html/xhprof/htdocs/
sudo git clone https://github.com/longxinH/xhprof.git .
By default, `xhprof_lib` will write your `.xhprof` files to the PHP `sys_temp_dir`, which is often system-wide readable & writable. That’s not very secure, so we should specify a more locked-down path.
You can specify the directory location for XHProf runs in at least two places:
- As `
xhprof.output_dir` in your `php.ini` file or - As the first argument to the `
XHProfRuns_Default()` constructor
We choose the latter, so make a backup of your `xhprof_html/index.php` file, and edit it so that `new XHProfRuns_Default()` becomes `new XHProfRuns_Default('/var/www/html/wordpress/xhprof/')`
root@host:/var/www/html/xhprof/htdocs/# sudo cp xhprof_html/index.php xhprof_html/index.orig.php
root@host:/var/www/html/xhprof/htdocs/# sudo vim xhprof_html/index.php
root@host:/var/www/html/xhprof/htdocs/#

root@host:/var/www/html/xhprof/htdocs/# diff index.orig.php index.php
83c83
< $xhprof_runs_impl = new XHProfRuns_Default();
---
> $xhprof_runs_impl = new XHProfRuns_Default( '/var/www/html/wordpress/xhprof/' );
root@host:/var/www/html/xhprof/xhprof-html#
Before we create the vhost (so apache actually serves the `/var/www/html/xhprof/htdocs` docroot), let’s create an `htpasswd` file (in the xhprof vhost dir but outside the document root) so that we can use it to password-protect the xhprof vhost (so it’s not available to everyone on the internet unless they have the username & password)
Run this command to add a user `xhprof-admin`. Type your passphrase at the prompt.
sudo htpasswd -Bc /var/www/html/xhprof/.htpasswd xhprof-admin
Now, let’s harden the permissions of these web server files
sudo chown -R root:www-data "/var/www/html/xhprof/"
sudo find "/var/www/html/xhprof/" -type d -exec chmod 0050 {} \;
sudo find "/var/www/html/xhprof/" -type f -exec chmod 0040 {} \;
Finally, we add the apache vhost file.
sudo bash -c 'cat << EOF > /etc/apache2/sites-available/xhprof.conf
<VirtualHost 127.0.0.1:443>

   ServerName xhprof.example.com
   DocumentRoot "/var/www/html/xhprof/htdocs"

   # block dot (hidden) files
   <LocationMatch "/\.(?!well\-known)">
      Require all denied
   </LocationMatch>

   # block config files
   <LocationMatch "config.php">
      Require all denied
   </LocationMatch>

   <Directory "/var/www/html/xhprof/htdocs">
      AuthType Basic
      AuthName "Protected"
      AuthUserFile /var/www/html/xhprof/.htpasswd
      Require valid-user

      # Harden vhost docroot by blocking all request types except the 3 essentials
      # Note: The debian wiki actually says not to use this since it can result in
      #       disabling auth modules, so be careful
      #        * https://wiki.debian.org/Apache/Hardening
      <LimitExcept GET POST HEAD>
         Require all denied
      </LimitExcept>

      Options -Indexes -Includes
      AllowOverride None
   </Directory>

</VirtualHost>
EOF'

sudo ln -s /etc/apache2/sites-available/xhprof.conf /etc/apache2/sites-enabled/xhprof.conf

sudo vim /etc/apache2/sites-available/xhprof.conf
Be sure to change:
- `
example.com` to your domain - `
127.0.0.1` to your server’s IP address (if you want to serve it publicly) - Add lines for your TLS cert for https, which is outside the scope of this article
Test the sanity of your apache config and restart the `apache2` service
sudo apachectl configtest && sudo systemctl restart apache2
Generating XHProf Reports
You should now be able to generate `.xhprof` files!
If you added the first code block above to your `wp-config.php` file, then just access your site and set the `profile` GET variable to your `secret-string`.
Your wordpress site will load like normal, but it will spit-out a timestamped `.xhprof` file to your XHProf Storage Directory.
root@host:/var/www/html# du -sh /var/www/html/wordpress/xhprof/*
1,8M    wordpress/xhprof/62906fb2c49b4.2022-05-27T06:29:06Z.xhprof
root@host:/var/www/html#
Viewing XHProf Reports
You should now be able to view your `.xhprof` files using your xhprof vhost (password protected username = `xhprof-admin` and the password you typed into `htpasswd` above).
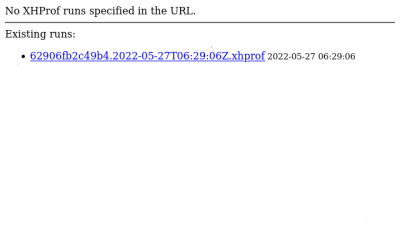
After authenticating in the above page, you should be prompted with a list of `.xhprof` files.
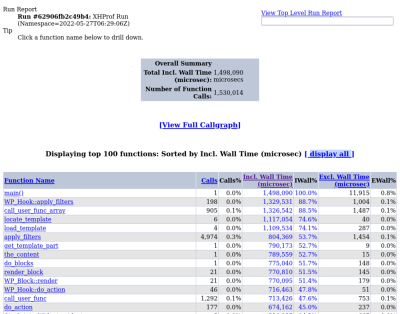
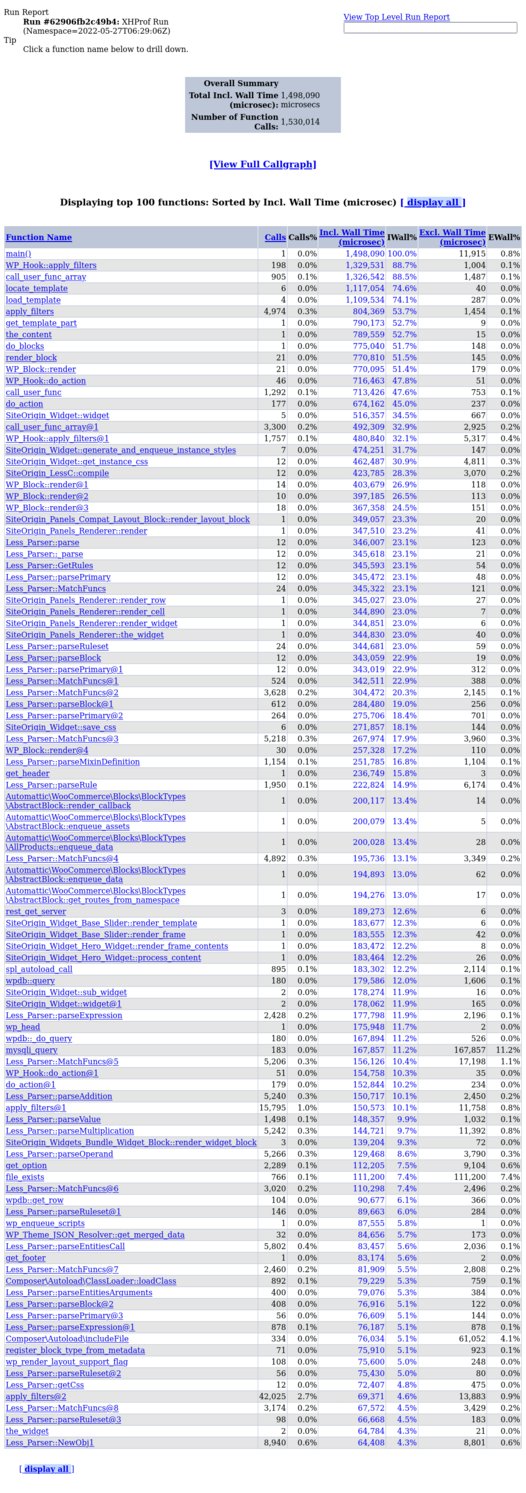
If you click on a given report, then it will show you the list of all the functions that were called to generate the page. By default, they’re sorted by the wall time that the function call ran in microseconds (1,000,000 microseconds = 1 second)
In this example, we see that the wordpress `main()` function’s wall clock runtime was 1,498,090 microseconds = 1.5 seconds.
Once you know which functions are slow, you can drill-down into them and begin debugging to see what are your webpage generation bottlenecks.
Further Reading
- Official PHP Documentation on Xhprof
- Profiling Drupal with XHProf
- XHGUI – scaleable alternative to xhprof_html
- excimer – An XHProf alternative used by Wikipedia
- Varnish Cache – a critically important tool to optimize wordpress page loads
Struggling to follow this guide?
If your organization has a wordpress site that’s running slow, and you can’t figure out why, please contact me about your project.
I can provide support for an hourly fee.
Related Posts
Hi, I’m Michael Altfield. I write articles about opsec, privacy, and devops ➡


Leave a Reply